
Although 1-bit pixel art only uses two colours, don’t let its simplicity deceive you! The restriction leads to some unique approaches, and working in 1-bit is a very fun and unique challenge. In this video we explore a few ways to approach the 1-bit style, and then I share a timelapse of a brand new 1-bit pixel art piece!
————
Check out my art here:
https://instagram.com/brandonjamesgreer
————
I commissioned the music in this video from these fantastic artists:
Title sequence theme music by Failpositive:
http://www.failpositive.bandcamp.com/
https://www.twitter.com/failpositiv
All other background music by mcguy215:

This video takes a simple look at using transformation matrices to transform 2D sprites with rotation, translation, scaling and shearing.
Blog: https://www.onelonecoder.com
Twitter: @javidx9
Twitch: javidx9
Patreon: https://www.patreon.com/javidx9

Coding is a wonderful hobby. It's challenging, rewarding and genuinely useful. I think it's harder today to start learning how to program, but easier to give it a go. Here are my 8 bits of advice for those wanting to take the leap!

Code & Transcript : http://bit.ly/arduinopong2
Kit I'm Using : https://amzn.to/2CKUuNB
https://www.patreon.com/derekbanas
As we continue making Pong with an Arduino, I now create the code to make the ball handle collision detection, movement and way much more. We are building Pong on a constrained piece of hardware using raw binary bits and clever algorithms. Like before I'll live code everything with very little preparation so that you can see my thinking process.

Get the Code : http://bit.ly/arduinopong3
Kit I'm Using : https://amzn.to/2RXNu49
https://www.patreon.com/derekbanas
In this video I finish creating Pong on an LCD Panel with an Arduino. I combine the code for making the Paddles work, with the code for making the ball bounce.
We mainly have to consolidate printing to the LCD panel, while making sure we don't have any character number conflicts. If you made this project along with me please tell me.

I always wanted to build one of these, but instead of using a Raspberry Pi I'm using a regular Arduino UNO with a little memory trick to save all the characters information.
You can find more information about this and other tutorials on my website: https://brainy-bits.com/
Facebook: https://www.facebook.com/brainybits/
Twitter: https://twitter.com/Brainy_Bits

Get the Circuit : http://bit.ly/arduino6
Kit I'm Using : https://amzn.to/2Qsj8WW
Best Arduino Book : https://amzn.to/2p65YSM
https://www.patreon.com/derekbanas
After the last video many people asked me how to read schematic diagrams so this time I'll walk you through the process of taking a schematic diagram to a finished circuit. This time we will be creating a NAND Gate. NAND Gates are awesome because they can be used to build all the other gates. They are the basic component from which a computer is made.
Thank you to my Patreon Supports like quietsource.org

Circuit Diagrams : http://bit.ly/arduinotut7
Best Arduino Book : https://amzn.to/2xGWt0h
https://www.patreon.com/derekbanas
This tutorial takes the next step towards understanding how a bunch of resistors and transistors turn into a real computer.
Previously we created gates and now we will use them to create both a 1 Bit & a 4 Bit Binary Calculator on a breadboard. I'm using a NAND 7400 IC to create an XOR Gate. I'm using a 4 Bit Binary Adder 74LS283 IC to create that circuit.
Thank you to my Patreon Supports like quietsource.org

Get the Code / Transcript : http://bit.ly/arduinotut8
Kit I'm Using : https://amzn.to/2Ngkuky
https://www.patreon.com/derekbanas
I tried to cover a ton in this tutorial. I'll show how to use LCD Panels with Arduino. I then live code Conway's Game of Life using an Arduino and a LCD Panel. Along the way we'll create custom characters, convert from binary to base 10, generate random arrays, copy arrays and a whole lot more. I hope these functions will be useful in numerous personal projects you may have.
Thank you to my Patreon Supports like quietsource.org

Get the Code : http://bit.ly/arduinopong
Kit I'm using : https://amzn.to/2pB6poG
https://www.patreon.com/derekbanas
Someone requested that I make the game Pong on a 16 x 2 LCD panel and so I start doing that in this tutorial. I'm going to live code everything with no preparation ahead of time, so that you can see how I solve this problem.
I focus this time on drawing on the LCD panel, moving the paddles and processing user input along with much more.

Get the Code : http://bit.ly/arduinotut
Subscribe to Me: http://bit.ly/2FWQZTx
Genuine Arduino : https://amzn.to/2nHD5Mk
Kit I'm Using : https://amzn.to/2PdbwXI
Best Arduino Beginner Book : https://amzn.to/2MuT7qS
►► Get my Python Programming Bootcamp Series for $9.99 ( Expires Jan 29th ) : http://bit.ly/SavePython10
►► Highest Rated Python Udemy Course + 18 Hrs + 81 Videos + New Videos Every Week
Like the channel? Consider becoming a Patreon! Check it out here:
►► https://www.patreon.com/derekbanas
In this tutorial I'll cover the core C language used to program Arduinos. We'll look at ports, the serial monitor, looping, data types, conditionals, setup, loop, static, functions, arrays, strings, numerous math functions, bit manipulation, random, structs, styling text, pointers and much more.
I make multiple little projects here, but the projects will get more advanced as I make more videos.
*Watch More Learn in One Videos*
►► Java - https://youtu.be/n-xAqcBCws4
►► C++ - https://youtu.be/Rub-JsjMhWY
►► Python - https://youtu.be/N4mEzFDjqtA
►► MySQL - https://youtu.be/yPu6qV5byu4
►► PHP - https://youtu.be/7TF00hJI78Y
►► Kotlin - https://youtu.be/H_oGi8uuDpA
►► C# - https://youtu.be/lisiwUZJXqQ
►► JavaScript - https://youtu.be/fju9ii8YsGs

Get the Code : http://bit.ly/arduinotut1
Kit I'm using : https://amzn.to/2nYWatu
Best Arduino Book : https://amzn.to/2N5euMp
https://www.patreon.com/derekbanas
Here I begin a massive tutorial on Arduino and Electronics! In this first video I cover Arduino Basics, Electricity, Ground, Voltage, Current, Resistance, Power, Protecting Components, LEDs, Breadboards, Arduino Coding, Ohm's Law, Generating Different Voltages with Arduino, 2 Circuits and much more.
Electronics Tutorial : https://youtu.be/XYJ_AUOw4aE
Arduino C Programming : https://youtu.be/QO_Jlz1qpDw
Arduino IDE : https://www.arduino.cc/en/Main/Software
Thank you to my Patreon supports like the following :

Get the Code : http://bit.ly/arduinotut2
Kit I'm Using : https://amzn.to/2LAJzG7
Best Arduino Book : https://amzn.to/2PfV5ZP
https://www.patreon.com/derekbanas
In this part of my Arduino tutorial I'll cover how to measure current, resistance and voltage with a multimeter. I'll also show how to measure voltage with an Arduino with a demonstration using a potentiometer and LED. To finish off I'll show the difference between resistors in series versus parallel and a whole lot more.
Thank you to my Patreon supports like the following :

Get the Code : http://bit.ly/arduinotut3
Kit I'm Using : https://amzn.to/2MIIeTa
Best Arduino Book : https://amzn.to/2NcJPQo
https://www.patreon.com/derekbanas
In the last video I asked for requests so in this video I cover those requests. I'll make both a Proximity Sensor and a Piano using an Arduino.
We'll learn about Ultrasonic Sensors, How Sound is Turned into a Current, Passive Buzzers and much more.
Thank you to my Patreon supports like the following :

Get the Code : http://bit.ly/arduinotut4
Kit I'm using : https://amzn.to/2wLYrwI
Best Arduino Book : https://amzn.to/2Q5BEnL
https://www.patreon.com/derekbanas
In this part of my Arduino tutorial we'll create 2 separate projects. First we'll learn how 7 segment displays work and then create a dice simulation rolling circuit. We'll then learn how to create a theremin, which is a weird instrument you can play without touching it. In addition we'll learn about photoresistors, importing libraries, voltage dividers, map and much more.
Code & Circuits Here : http://bit.ly/arduinotut5
Kit I'm Using : https://amzn.to/2QkYqIA
Best Arduino Book : https://amzn.to/2x2bo61
https://www.patreon.com/derekbanas
My most active subscriber asked me to show how to make a calculator with circuits and so I begin that journey with this video. To make a calculator you need to understand Transistors as well as Transistor Gates. I make 4 circuits, one to demonstrate how transistors work as well as NOT, OR & AND Gates.
Transistor Kit : https://amzn.to/2CHufbL
Resistor Kit : https://amzn.to/2N2Tf1X

The full Arduino Workshop in step-by-step format can be found here https://core-electronics.com.au/tutorials/arduino-workshop-for-beginners.html
In this section, you'll be learning about control individual bits within bytes using bit-wise operators and logic.
We're official retailers for Arduino in Australia - powered by makers, for makers! https://core-electronics.com.au/arduino.html

The full Arduino Workshop in step-by-step format can be found here https://core-electronics.com.au/tutorials/arduino-workshop-for-beginners.html
In this section, we're going to look at using arithmetic, relational, logical, and assignment operators. These are all used for comparing and evaluating data.
We're official retailers for Arduino in Australia - powered by makers, for makers! https://core-electronics.com.au/arduino.html

The full Arduino Workshop in step-by-step format can be found here https://core-electronics.com.au/tutorials/arduino-workshop-for-beginners.html
In this chapter you'll learn about:
- Using variables within Arrays
- Using arithmetic, relational, logical, and assignment operators
- Manipulating data using bit-wise operators and logic
- Storing information between resets using EEPROM
By the end of this chapter, you will have created an LED sequencing display using arrays, operators, and EEPROM storage.
We're official retailers for Arduino in Australia - powered by makers, for makers! https://core-electronics.com.au/arduino.html

The full tutorial for this video (with images and step-by-step tips) https://core-electronics.com.au/tutorials/arduino-workshop-for-beginners.html
In this section, we'll look at using arrays to store data, which allows for more powerful variable manipulation.
Core Electronics is your home in Australia for:

The full Arduino Workshop in step-by-step format can be found here https://core-electronics.com.au/tutorials/arduino-workshop-for-beginners.html
In this section, we'll learn about storing data in the non-volatile memory known as EEPROM. This allows data to be retained when power is disconnected and accessed later.
We're official retailers for Arduino in Australia - powered by makers, for makers! https://core-electronics.com.au/arduino.html

The full tutorial for this video (with images and step-by-step tips) https://core-electronics.com.au/tutorials/arduino-workshop-for-beginners.html
In this chapter you'll learn about:
- Using and including libraries in your projects
- Using the SPI interface to send/receive serial data
- Using the I2C interface to send/receive serial data
- Expanding your project with the Arduino hardware format called 'Shields'
Core Electronics is your home in Australia for:

The full tutorial for this video (with images and step-by-step tips) https://core-electronics.com.au/tutorials/arduino-workshop-for-beginners.html
In this section, you'll look at using the I2C interface to send and receive serial data for interfacing with sensors and other devices.
Core Electronics is your home in Australia for:
The full tutorial for this video (with images and step-by-step tips) https://core-electronics.com.au/tutorials/arduino-workshop-for-beginners.html
In this section, we'll look at how to use interrupts. You may have heard of them before, and they're a great way to increase your program's efficiency when dealing with hardware inputs.
Core Electronics is your home in Australia for:

The full tutorial for this video (with images and step-by-step tips)
In this section, we'll be taking a look at using hardware add-on modules known as 'shields'. They're a great way to easily expand your project's capabilities.
Core Electronics is your home in Australia for:
Raspberry Pi https://core-electronics.com.au/brands/raspberry-pi-australia
Arduino https://core-electronics.com.au/brands/arduino-australia
Sparkfun https://core-electronics.com.au/brands/sparkfun-australia
Adafruit https://core-electronics.com.au/brands/adafruit-australia
Pololu https://core-electronics.com.au/brands/pololu-australia
DFRobot https://core-electronics.com.au/brands/dfrobot-australia

The full tutorial for this video (with images and step-by-step tips) https://core-electronics.com.au/tutorials/arduino-workshop-for-beginners.html
In this section, we'll be looking at using code modules called 'libraries' which can be used to simplify complex applications.
Core Electronics is your home in Australia for:

The full tutorial for this video (with images and step-by-step tips) https://core-electronics.com.au/tutorials/arduino-workshop-for-beginners.html
In this section, you'll learn how to use the SPI interface to send and receive serial data for interfacing with sensors and other devices.
Core Electronics is your home in Australia for:

The full tutorial for this video (with images and step-by-step tips) https://core-electronics.com.au/tutorials/arduino-workshop-for-beginners.html
It's time to wrap up the Arduino Workshop, so I'm going to recommend a couple of my favourite resources for projects and questions.
Core Electronics is your home in Australia for:

The full tutorial for this video (with images and step-by-step tips) https://core-electronics.com.au/tutorials/arduino-workshop-for-beginners.html
Core Electronics is your home in Australia for:

The full Arduino Workshop in step-by-step format can be found here https://core-electronics.com.au/tutorials/arduino-workshop-for-beginners.html
In this section, we'll take a look at the Arduino IDE, which is where you write the code for your Arduino, upload it, and communicate with your board. We'll also cover the programming language that Arduino IDE uses, and where to download it.
We're official retailers for Arduino in Australia - powered by makers, for makers! https://core-electronics.com.au/arduino.html

The full Arduino Workshop in step-by-step format can be found here https://core-electronics.com.au/tutorials/arduino-workshop-for-beginners.html
In the final section of this chapter, we'll talk through using the Arduino IDE to upload your first program to your Arduino.
We're official retailers for Arduino in Australia - powered by makers, for makers! https://core-electronics.com.au/arduino.html

The full Arduino Workshop in step-by-step format can be found here https://core-electronics.com.au/tutorials/arduino-workshop-for-beginners.html
Welcome to the Arduino Workshop, where you'll be able to follow our guided course which covers everything you'll need to know in order to create your own Arduino projects and become a leveled up maker. My name is Sam and along with being a maker myself, I also enjoy teaching others how to use different technology and create amazing projects. Along with the course videos themselves, you can find all of the related course material such as code examples, circuit diagrams, schematics, images, and other resources.
We're official retailers for Arduino in Australia - powered by makers, for makers! https://core-electronics.com.au/arduino.html

The full Arduino Workshop in step-by-step format can be found here https://core-electronics.com.au/tutorials/arduino-workshop-for-beginners.html
In this section, you'll be learning about the various ways to power your Arduino, and how to connect it up to your computer for uploading your programs, and communicating to the computer using the serial port.
We're official retailers for Arduino in Australia - powered by makers, for makers! https://core-electronics.com.au/arduino.html

The full Arduino Workshop in step-by-step format can be found here https://core-electronics.com.au/tutorials/arduino-workshop-for-beginners.html
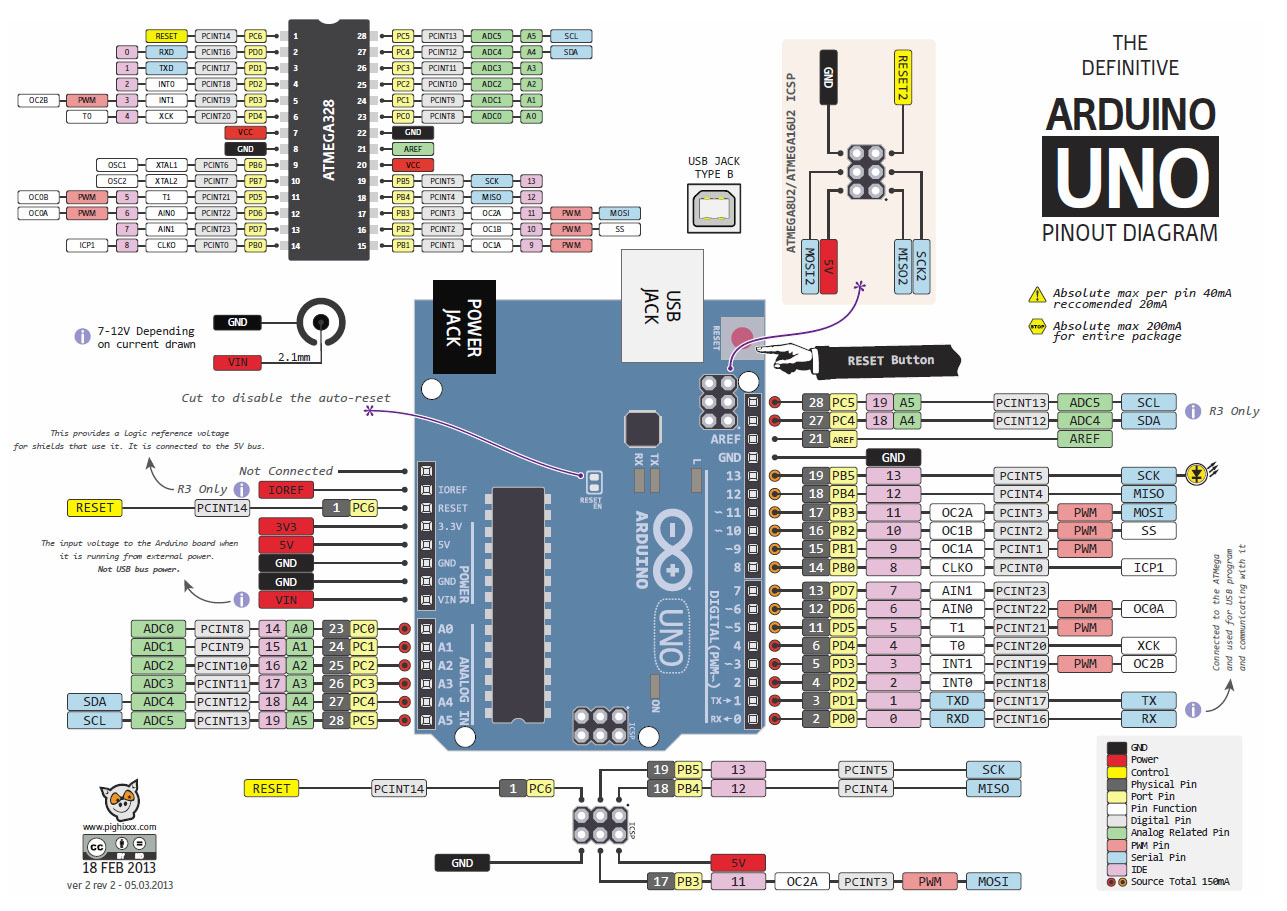
In this section, you'll learn about the features and capabilities of the Arduino Uno board, how the layout of the board can affect your project, and why the Uno is such a great all-rounder.
We're official retailers for Arduino in Australia - powered by makers, for makers! https://core-electronics.com.au/arduino.html

The full Arduino Workshop in step-by-step format can be found here https://core-electronics.com.au/tutorials/arduino-workshop-for-beginners.html
In this section, we'll be looking at what is a microcontroller (the chip at the heart of any Arduino board), an overview of how they work, and how it integrates with the Arduino environment.
We're official retailers for Arduino in Australia - powered by makers, for makers! https://core-electronics.com.au/arduino.html

The full Arduino Workshop in step-by-step format can be found here https://core-electronics.com.au/tutorials/arduino-workshop-for-beginners.html
In this section, we look at what is Arduino, what it's good for makers, and some of the different types of Arduino boards available.
We're official retailers for Arduino in Australia - powered by makers, for makers! https://core-electronics.com.au/arduino.html

The full Arduino Workshop in step-by-step format can be found here https://core-electronics.com.au/tutorials/arduino-workshop-for-beginners.html
In this section, we'll be learning about using and creating your own functions to write modular, reusable code.
We're official retailers for Arduino in Australia - powered by makers, for makers! https://core-electronics.com.au/arduino.html

The full Arduino Workshop in step-by-step format can be found here https://core-electronics.com.au/tutorials/arduino-workshop-for-beginners.html
In this section, you'll look at 'for' loops which you can use to control the flow of your program.
We're official retailers for Arduino in Australia - powered by makers, for makers! https://core-electronics.com.au/arduino.html

The full Arduino Workshop in step-by-step format can be found here https://core-electronics.com.au/tutorials/arduino-workshop-for-beginners.html
In this section, we'll be looking at using 'If' statements, which are the backbone of decision-making for microcontrollers.
We're official retailers for Arduino in Australia - powered by makers, for makers! https://core-electronics.com.au/arduino.html

The full Arduino Workshop in step-by-step format can be found here https://core-electronics.com.au/tutorials/arduino-workshop-for-beginners.html
In this chapter you'll learn about:
- Using 'If' statements
- Using 'while' loops
- Using 'for' loops
- Using 'Switch cases'
- Using maths in Arduino
- Creating functions
- Creating sophisticated code
- By the end of this chapter, you will have created your very own calculator using different functions, loops, and Serial functions.
We're official retailers for Arduino in Australia - powered by makers, for makers! https://core-electronics.com.au/arduino.html

The full Arduino Workshop in step-by-step format can be found here https://core-electronics.com.au/tutorials/arduino-workshop-for-beginners.html
In this section, we'll dive into using 'switch' cases to implement comparative lists and outcomes.
We're official retailers for Arduino in Australia - powered by makers, for makers! https://core-electronics.com.au/arduino.html

The full Arduino Workshop in step-by-step format can be found here https://core-electronics.com.au/tutorials/arduino-workshop-for-beginners.html
In this section, we'll look at how to use different mathematic functions and methods in Arduino.
We're official retailers for Arduino in Australia - powered by makers, for makers! https://core-electronics.com.au/arduino.html

The full Arduino Workshop in step-by-step format can be found here https://core-electronics.com.au/tutorials/arduino-workshop-for-beginners.html
In this section, you'll learn about using 'while' loops and how to use them to change the structure of your code.
We're official retailers for Arduino in Australia - powered by makers, for makers! https://core-electronics.com.au/arduino.html

The full Arduino Workshop in step-by-step format can be found here https://core-electronics.com.au/tutorials/arduino-workshop-for-beginners.html
In this section, we'll look at using different components such as LEDs, buttons, jumper wires, resistors, and a breadboard to construct a circuit.
We're official retailers for Arduino in Australia - powered by makers, for makers! https://core-electronics.com.au/arduino.html

The full Arduino Workshop in step-by-step format can be found here https://core-electronics.com.au/tutorials/arduino-workshop-for-beginners.html
In this chapter you'll learn about:
- How to properly structure your code
- Using variables to write more capable programs
- Building circuits using a breadboard
- Reading inputs and controlling outputs using the digital and analog pins
- Communicating via the serial port
By the end of the chapter, you will have created an input interface for your Arduino, using the Serial Monitor to display the data.
We're official retailers for Arduino in Australia - powered by makers, for makers! https://core-electronics.com.au/arduino.html

The full Arduino Workshop in step-by-step format can be found here https://core-electronics.com.au/tutorials/arduino-workshop-for-beginners.html
In this section, we'll be learning about how to properly structure code using indentations, nested levels, and semicolons.
We're official retailers for Arduino in Australia - powered by makers, for makers! https://core-electronics.com.au/arduino.html

The full Arduino Workshop in step-by-step format can be found here https://core-electronics.com.au/tutorials/arduino-workshop-for-beginners.html
In this section, we'll learn how to use the analog pins to read inputs and control outputs.
We're official retailers for Arduino in Australia - powered by makers, for makers! https://core-electronics.com.au/arduino.html
The full Arduino Workshop in step-by-step format can be found here https://core-electronics.com.au/tutorials/arduino-workshop-for-beginners.html
In this section, we'll learn how to use the digital pins to read inputs and control outputs.
We're official retailers for Arduino in Australia - powered by makers, for makers! https://core-electronics.com.au/arduino.html

The full Arduino Workshop in step-by-step format can be found here https://core-electronics.com.au/tutorials/arduino-workshop-for-beginners.html
In this section, we'll be looking at using the serial port on the Arduino to communicate with a computer via USB.
We're official retailers for Arduino in Australia - powered by makers, for makers! https://core-electronics.com.au/arduino.html

The full Arduino Workshop in step-by-step format can be found here https://core-electronics.com.au/tutorials/arduino-workshop-for-beginners.html
In this section, we'll explore the use of variables, which will allow you to write more sophisticated code.
We're official retailers for Arduino in Australia - powered by makers, for makers! https://core-electronics.com.au/arduino.html

The full Arduino Workshop in step-by-step format can be found here https://core-electronics.com.au/tutorials/arduino-workshop-for-beginners.html
Welcome to the Arduino Workshop, where you'll be able to follow our guided course which covers everything you'll need to know in order to create your own Arduino projects and become a leveled up maker. My name is Sam and along with being a maker myself, I also enjoy teaching others how to use different technology and create amazing projects. Along with the course videos themselves, you can find all of the related course material such as code examples, circuit diagrams, schematics, images, and other resources.
We're official retailers for Arduino in Australia - powered by makers, for makers! https://core-electronics.com.au/arduino.html
Our computer's clock is built using several 555 timers. The first is configured as an astable oscillator. See https://eater.net/bbcpu8-clock-module for more.
Part 2: https://youtu.be/81BgFhm2vz8
Part 3: https://youtu.be/WCwJNnx36Rk
Part 4: https://youtu.be/SmQ5K7UQPMM
Support me on Patreon: https://www.patreon.com/beneater
You can get all the components used in this video from any online electronic components distributor for a few dollars.
Complete parts list (everything in this video):
1x 555 timer IC
1x 1MΩ potentiometer
2x 1kΩ resistors
1x 100kΩ resistor
1x 330Ω resistor
1x 2µF capacitor
1x 0.1µF capacitor
1x 0.01µF capacitor
1x LED
Solderless breadboard
22 gauge wire
USB charger and cable or some other 5v power source

Whew! A 2-in-1 feature length video this one, but it covers a lot to bring this project up to date. First I discuss the project structure and designing for modification. Then I implement Lua to handle external scripting and asset management. Next I completely rebuild the engine making it more modular, and implement basic city elements. Then I discuss a strategy for various types of automata, such as pedestrians, vehicles and police, and implement them, whilst obeying the rules of the road.
Source: https://github.com/OneLoneCoder/olcPixelGameEngine/tree/master/Videos/CarCrimeCity/Part2
YouTube: https://www.youtube.com/javidx9
https://www.youtube.com/javidx9extra
Discord: https://discord.gg/WhwHUMV
Twitter: https://www.twitter.com/javidx9
Twitch: https://www.twitch.tv/javidx9
GitHub: https://www.github.com/onelonecoder
Patreon: https://www.patreon.com/javidx9
Homepage: https://www.onelonecoder.com

BIG PROJECT! BIG YEAR! BIG AUDIENCE! BIG VIDEO! Let's get back at it with a Code-It-Yourself! Special. This is the first part of a series of videos where I will make a top down game, based upon auto crime in a large city. Now this is a big video, it covers conversion of the 3D Engine series into a PGE Extension and editing a city using mouse picking with rays.
Discord: https://discord.gg/WhwHUMV
YT Extra: https://www.youtube.com/javidx9extra
Twitter: https://www.twitter.com/javidx9
Twitch: https://www.twitch.tv/javidx9
GitHub: https://www.github.com/onelonecoder
Patreon: https://www.patreon.com/javidx9
Homepage: https://www.onelonecoder.com

Our computer's clock is built using several 555 timers. The second is configured as a bistable multivibrator to debounce the toggle switch for selecting between the clock oscillator and manual clock stepping. See https://eater.net/bbcpu8-clock-module for more.
Part 1: https://youtu.be/kRlSFm519Bo
Part 2: https://youtu.be/81BgFhm2vz8
Part 4: https://youtu.be/SmQ5K7UQPMM
Support me on Patreon: https://www.patreon.com/beneater
You can get all the components used in this video from any online electronic components distributor for a few dollars.
Complete parts list (everything in this video):
- Circuit from parts 1 and 2
- 1x 555 timer IC
- 2x 1kΩ resistors
- 1x 330Ω resistor
- 1x 0.01µF capacitor
- 1x Double-pole toggle switch
- 1x LED
- 22 gauge wire

Twitter: https://twitter.com/GreatScottLab
Facebook: https://www.facebook.com/greatscottlab
Previous video:http://youtu.be/uQMUPhyoXoE
Part 1:http://youtu.be/EnM3p2TmWXc
How to Multiplex:http://youtu.be/uQMUPhyoXoE
More project info on Instructables:http://www.instructables.com/id/Build-your-own-4x4x4-RGB-LED-Cube/
Arduino Code+Schematic:http://www.mediafire.com/download/d1irxfrmjic3txj/RGBLEDCube_GreatScott!.rar
Parts list (affiliate links):
Aliexpress:
RGB LEDs Common Anode: https://s.click.aliexpress.com/e/_dZ2unDY
Silvered Copper Wire (Bridge Wire): https://s.click.aliexpress.com/e/_d6ClzWi
Solder: https://s.click.aliexpress.com/e/_dTGclAw
Ribbon Cable: https://s.click.aliexpress.com/e/_dXkghb4
DC Jack: https://s.click.aliexpress.com/e/_d6cVZVl
Switch: https://s.click.aliexpress.com/e/_d9dxPD5
Potentiometer (10k): https://s.click.aliexpress.com/e/_dX83GAF
Arduino Nano: https://s.click.aliexpress.com/e/_dULoNXh
TLC5940: https://s.click.aliexpress.com/e/_d7bKqAI
Resistor Kit: https://s.click.aliexpress.com/e/_dTPpXjt
Power Supply (5V, 2A): https://s.click.aliexpress.com/e/_d7d5TO6
Capacitor Kit: https://s.click.aliexpress.com/e/_dU4FEsB
Prototyping PCB: https://s.click.aliexpress.com/e/_dXx2Zv5
It is time to build the controller for the RGB LED Cube. After this video you will be able to build your very own Cube and use my first test animation to let it flash in a few different colors
Music:
In the Hall of the Mountain King, Kevin MacLeod (incompetech.com)

In this video, we'll build the first of three 8-bit registers used in the 8-bit computer!
Support me on Patreon: https://www.patreon.com/beneater
You can get all the components used in this video from any online electronic components distributor for a few dollars. See https://eater.net/bbcpu8-registers for more.
Complete parts list (everything in this video):
- 2x 74LS173 (4-bit D-type register)
- 1x 74LS245 (Octal bus transceiver)
- 8x LED
- 22 gauge wire
- 5 volt power source (e.g., a USB phone charger)
(The computer will have 3 registers like this; see the next video for details)

Before we build the registers for our 8-bit computer, this video describes the basic operation of the bus and how data moves from one module to another across the bus. See https://eater.net/bbcpu8-registers for more.
Support me on Patreon: https://www.patreon.com/beneater

This lesson will follow on from the previous one, showing you how to manipulate the data you've stored in various ways, allowing you to do more than just maths. I'll also go over some pitfalls you may come across during your time coding, and how to fix them.
The full guide: https://core-electronics.com.au/tutorials/c-programming-for-makers.html
Core Electronics is located in the heart of Newcastle, Australia. We're powered by makers, for makers. Drop by if you are looking for:
Raspberry Pi https://core-electronics.com.au/raspberry-pi.html
Arduino https://core-electronics.com.au/arduino.html
Sparkfun https://core-electronics.com.au/brands/sparkfun-australia
Adafruit https://core-electronics.com.au/brands/adafruit-australia
Pololu https://core-electronics.com.au/brands/pololu-australia
DFRobot https://core-electronics.com.au/brands/dfrobot-australia

Chapter 2 goes more in depth with the structure of C programs, including how to store and manipulate data, as well as a few tricks you can use in your projects.
The full guide: https://core-electronics.com.au/tutorials/c-programming-for-makers.html
Core Electronics is located in the heart of Newcastle, Australia. We're powered by makers, for makers. Drop by if you are looking for:
Raspberry Pi https://core-electronics.com.au/raspberry-pi.html
Arduino https://core-electronics.com.au/arduino.html
Sparkfun https://core-electronics.com.au/brands/sparkfun-australia
Adafruit https://core-electronics.com.au/brands/adafruit-australia
Pololu https://core-electronics.com.au/brands/pololu-australia
DFRobot https://core-electronics.com.au/brands/dfrobot-australia
This lesson explains what scope is, and how you can use it to your advantage in your projects.
The full guide: https://core-electronics.com.au/tutorials/c-programming-for-makers.html
Core Electronics is located in the heart of Newcastle, Australia. We're powered by makers, for makers. Drop by if you are looking for:
Raspberry Pi https://core-electronics.com.au/raspberry-pi.html
Arduino https://core-electronics.com.au/arduino.html
Sparkfun https://core-electronics.com.au/brands/sparkfun-australia
Adafruit https://core-electronics.com.au/brands/adafruit-australia
Pololu https://core-electronics.com.au/brands/pololu-australia
DFRobot https://core-electronics.com.au/brands/dfrobot-australia

In this section, we discuss the different types of data you can have and the best ways to store them in your programs.
The full guide: https://core-electronics.com.au/tutorials/c-programming-for-makers.html
Core Electronics is located in the heart of Newcastle, Australia. We're powered by makers, for makers. Drop by if you are looking for:
Raspberry Pi https://core-electronics.com.au/raspberry-pi.html
Arduino https://core-electronics.com.au/arduino.html
Sparkfun https://core-electronics.com.au/brands/sparkfun-australia
Adafruit https://core-electronics.com.au/brands/adafruit-australia
Pololu https://core-electronics.com.au/brands/pololu-australia
DFRobot https://core-electronics.com.au/brands/dfrobot-australia

Here I'll show you how you can store and retrieve data in variables, as well as how to use constant values that won't change but will help with code readability and reduce human error.
The full guide: https://core-electronics.com.au/tutorials/c-programming-for-makers.html
Core Electronics is located in the heart of Newcastle, Australia. We're powered by makers, for makers. Drop by if you are looking for:
Raspberry Pi https://core-electronics.com.au/raspberry-pi.html
Arduino https://core-electronics.com.au/arduino.html
Sparkfun https://core-electronics.com.au/brands/sparkfun-australia
Adafruit https://core-electronics.com.au/brands/adafruit-australia
Pololu https://core-electronics.com.au/brands/pololu-australia
DFRobot https://core-electronics.com.au/brands/dfrobot-australia
In this section, I'll show you how to understand the flowcharts I'll be using to explain the structures in the rest of this chapter.
The full guide: https://core-electronics.com.au/tutorials/c-programming-for-makers.html
Core Electronics is located in the heart of Newcastle, Australia. We're powered by makers, for makers. Drop by if you are looking for:
Raspberry Pi https://core-electronics.com.au/raspberry-pi.html
Arduino https://core-electronics.com.au/arduino.html
Sparkfun https://core-electronics.com.au/brands/sparkfun-australia
Adafruit https://core-electronics.com.au/brands/adafruit-australia
Pololu https://core-electronics.com.au/brands/pololu-australia
DFRobot https://core-electronics.com.au/brands/dfrobot-australia

In Chapter 3 we cover control structures, which will allow you to create a program flow that is more complex, but also more useful, than we have used so far. We go through how to make decisions and branch off into other bits of code, how to repeat something without having to copy and paste it as many times as you need, and also how to represent these structures graphically in order to visually see what's happening.
The full guide: https://core-electronics.com.au/tutorials/c-programming-for-makers.html
Core Electronics is located in the heart of Newcastle, Australia. We're powered by makers, for makers. Drop by if you are looking for:
Raspberry Pi https://core-electronics.com.au/raspberry-pi.html
Arduino https://core-electronics.com.au/arduino.html
Sparkfun https://core-electronics.com.au/brands/sparkfun-australia
Adafruit https://core-electronics.com.au/brands/adafruit-australia
Pololu https://core-electronics.com.au/brands/pololu-australia
DFRobot https://core-electronics.com.au/brands/dfrobot-australia

Here we'll dissect the Hello World program from the previous section, and explain the different parts of what makes up every C program and what they mean.
The full guide: https://core-electronics.com.au/tutorials/c-programming-for-makers.html
Core Electronics is located in the heart of Newcastle, Australia. We're powered by makers, for makers. Drop by if you are looking for:
Raspberry Pi https://core-electronics.com.au/raspberry-pi.html
Arduino https://core-electronics.com.au/arduino.html
Sparkfun https://core-electronics.com.au/brands/sparkfun-australia
Adafruit https://core-electronics.com.au/brands/adafruit-australia
Pololu https://core-electronics.com.au/brands/pololu-australia
DFRobot https://core-electronics.com.au/brands/dfrobot-australia

Get the Code Here: http://goo.gl/u23ZZ
Support me on Patreon : https://www.patreon.com/derekbanas
Welcome to part 1 of my C Video Tutorial! I have been getting this request constantly lately so I decided to cover the C programming language in a fast and complete tutorial series. It will probably be complete by the end of the weekend!
I cover: Comments, #include, #define, Global Variables, main(), char, int, long int, float, double, printf(), Escape Sequences, %d, %ld, %f, %c, %s, Character Arrays (Strings), strcpy, scanf(), Math Functions, Order of Operations, Math Shortcuts, Casting and more...

Get the Code & Transcription Here : http://goo.gl/H7l1QM
In this video I continue with my C Linked List tutorial. In part 9, I gave you homework and in this video I will show you my answer. You guys asked for more tutorials like this, so I'm giving it a try.
So, today I'll show you how to search through a Linked List. I'll also cover how to delete structs and remove them not only from the Linked List, but also from memory. All of the code from the video is linked to above along with a transcription.

Get the Code & Transcript Here : http://goo.gl/m4mAF6
In this part of the C Video Tutorial I will provide C File IO examples. I'll cover C Text File IO in this tutorial and the Binary File IO functions in the next part.
I specifically cover the following topics: FILE Data type, fopen(), fputs(), fseek(), ftell(), fgets(), fclose(), fscanf(), puts(), fprintf(), Different Ways to Access Files, and more. All of the code used is available below the video.

Get the Code & Transcription Here : http://goo.gl/y0UBJJ
Welcome to my C Binary File IO tutorial. With the binary view of a file you have access to all the bytes in the file. You can store strings, arrays, structs, etc.
Aside from showing how to save and retrieve strings, I'll also cover how to save array data and grab it out of the file randomly. I also briefly cover error handling in C.
All the code is available above along with a transcript of what I said for translation.

Get the Code and Transcription Here : http://goo.gl/jdkZqe
I have been asked many times to explain how to convert base 10 numbers into binary (Base 2), octal (Base 8) and hexadecimal (Base 16) numbers. Today I'll cover that topic.
I also cover how the different numbering systems work so that it will be easy to work with them in the videos that follow. All of the code can be found below along with a transcription to aid in translation.

Get the Code and Transcription Here : http://goo.gl/ykujrh
In the last part of my C Video Tutorial, I covered how to convert from base 10 to base 2, base 8 and base 16 with C.
At the end of that tutorial, I provided a homework assignment for you to write code that converts from any base back to base 10. In this tutorial, I will walk through exactly how to do that.
You can find all of the code above. Please leave any questions you may have.

Get the Code and Transcription Here : http://goo.gl/dnDuPg
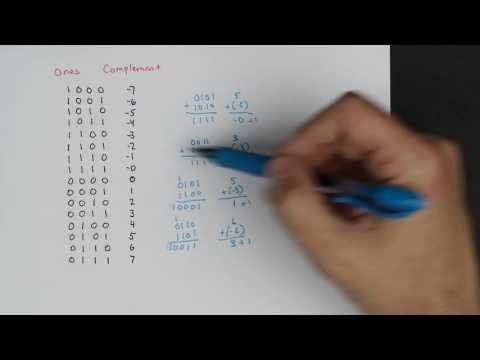
Welcome to part 15 of my C Video Tutorial! In this tutorial, I cover numerous topics.
First I go over how we can pass locations in memory between functions based on a request I received. Then I cover the Bitwise Operators AND, OR, Exclusive OR, and Shift Operators. We explore how signed numbers work and how the Ones Complement Operator can help. Then we look at Bit Masking and Binary Fractions.
I cover the Bitwise Operators AND, OR, Exclusive OR, Shift Operators, signed numbers, Ones Complement Operator, Bit Masking and Binary Fractions.

Get the Code Here : http://goo.gl/gyLN0
Welcome to part 2 of my C Video Tutorial. If you missed part 1 check it out first.
In this part of my C Tutorial I will cover: Compiling Options, Relational Operators, Logical operators, If, Else, Else If, Conditional Operator, Sizeof(), Bytes, Bits, While, Do While, For, Break, Continue and more...

Get the Code Here : http://goo.gl/x3oiwE
In this tutorial I cover : exit(), switch, Arrays, Array Indexes, Problems with scanf(), Memory Overflow, strcpy(), fgets(), Array Interation, strcmp(), strcat(), strlen(), strlcpy(), Global Variables, Local Variables, Functions, and more...
The code above is heavily commented and will help you learn. Feel free to leave any questions you have.

Get the Code Here : http://goo.gl/Q8sGfU
Welcome to part 4 of my C Video Tutorial! Today I'm going to try something a little different to try and make the videos feel more like a classroom atmosphere.
We'll be looking at pointers in c. I'll cover what pointers are. What is the difference between * and &. How to use pointers and arrays. How to create an array of strings. We'll also look at how to change the value of variables inside of functions and how to manipulate char arrays in functions.

Get the Code Here : http://goo.gl/12DBHg
Today I'm going to cover how to create and use a struct in C. Structs are used when you need more then one piece of data to describe one thing. You can't use an array because an array only holds data with the same data type
I'll specifically cover how to : Create a Struct, Get data from a Struct, Initialize a Struct, Pass a Struct to a Function, Use Typedef, Change a Value in a Struct, Use a Struct in a Function, ->, *(structName) and how a Struct is stored in memory.

Get the Code Here : http://goo.gl/zRT75P
Welcome to part 6 of my C video tutorial. Today I'm going to cover Unions, Enumerated Types, the Designated Initializer, Using unions in Structs, Recursive Structures, Linked Lists and much more.
I'm also going to experiment with a new style that is more interactive and I hope it feels more like a classroom setting. Throughout the tutorial I will constantly insert brain teasers. Hopefully they aren't distracting. I do this every once in a while to try and improve.

Get the Code Here : http://goo.gl/vLEliW
In this tutorial, I'm going to cover a bunch of topics that you have requested and that I have skipped.
I cover the following: strchr(), strrchr(), tolower(), toupper(), ctype.h Functions, _Bool, bool, Numerous Ways to Except Input, getchar(), putchar(), Buffering, gets(), puts(), fgets(), fputs(), How to Eliminate Newline, How to Make a String Lowercase, strcmp() and more.

Get the Code Here : http://goo.gl/t260jk
Welcome to part 8 of my C Video Tutorial. In this video I cover a topic I have received many requests for. This is basically a C Malloc Tutorial.
Malloc() ( Memory Allocator ) is used to dynamically set aside memory at run time. Because malloc() returns a pointer to that location in memory it can be a bit confusing. I'll cover how to store both regular data types as well as structs using malloc().

Get the Code and Transcription : http://goo.gl/3HkALO
Welcome to my linked list structure or linked list struct tutorial. I have been asked to cover these structs numerous times lately and so I will do so.
In this tutorial and the next I will show how to create an unlimited number of structs using malloc. I'll focus on creating the structs, adding them to the list and then how to display them.
Because you guys ask for homework all of the time, you'll then get the opportunity to write the code on how to search through the linked list, how to delete structs and free memory.

Our computer's clock is built using several 555 timers. This video covers the logic that ties them together, resulting in the completed clock module. See https://eater.net/bbcpu8-clock-module for more.
Part 1: https://youtu.be/kRlSFm519Bo
Part 2: https://youtu.be/81BgFhm2vz8
Part 3: https://youtu.be/WCwJNnx36Rk
Support me on Patreon: https://www.patreon.com/beneater
You can get all the components used in this video from any online electronic components distributor for a few dollars.
Complete parts list (everything in this video):
- Circuit from parts 1, 2, and 3
- 1x 74LS04 (Hex inverter)
- 1x 74LS08 (Quad AND gate)
- 1x 74LS32 (Quad OR gate)
- 1x LED
- 22 gauge wire

I was challenged to code the classic game Breakout in 30 minutes, live, in front of a demanding audience ;-) This video shows how I got on. Don't worry, I'm not going to regularly upload my live-streams, but I thought this one demonstrated just how quick a prototyping tool the olcConsoleGameEngine can be.
Blog: http://www.onelonecoder.com
Twitter: @javidx9
Twitch: javidx9

This video is part #1 of a new series where I construct a 3D graphics engine from scratch. I start at the beginning, setting up the project, then discuss vertices and triangles. Next a description of how 3D coordinates are converted into on-screen 2D coordinates using a projection matrix. This results in seeing a cube being rotated in 2-axis and translated.
Source: https://github.com/OneLoneCoder/videos/blob/master/OneLoneCoder_olcEngine3D_Part1.cpp
Blog: http://www.onelonecoder.com
Twitter: @javidx9
Twitch: javidx9

Phew, it's a long one but I feel necessary to get this series moving. This video describes how to implement cameras and clipping planes in a 3D engine. In addition, I derive the look at and point at matrices, typically used in cameras, and talk about how to clip triangles against planes in world space, views space and screen space
Source: https://github.com/OneLoneCoder/videos/blob/master/OneLoneCoder_olcEngine3D_Part3.cpp
Blog: http://www.onelonecoder.com
Twitter: @javidx9
Twitch: javidx9

By popular request I decided to have a go at implementing texturing in my command prompt 3D engine. I'm quite pleased with the results! This video shows perspective correct texture sampling, scan-line triangle rasterizing and depth buffers.
Source: https://github.com/OneLoneCoder/videos/blob/master/OneLoneCoder_olcEngine3D_Part4.cpp
Blog: http://www.onelonecoder.com
Twitter: @javidx9
Twitch: javidx9

In Part #2 of this series, I setup more fundamentals, including triangle culling if it can't be seen, surface illumination and a quick way to import Object files from 3D modelling software.
Source: https://github.com/OneLoneCoder/videos/blob/master/OneLoneCoder_olcEngine3D_Part2.cpp
Discord: https://discord.gg/WhwHUMV
Blog: http://www.onelonecoder.com
Twitter: @javidx9
Twitch: javidx9

OK. Firstly, sorry it's a long one. This implementation of Asteroids started out simply, but then I just though what the heck, let's do it properly! This video shows how to implement asteroids at the command prompt using simple C++ and basic mathematics.
Code: https://github.com/OneLoneCoder/videos/blob/master/OneLoneCoder_Asteroids.cpp
Blog: www.onelonecoder.com

With a bit of time on my hands, I decided to have a go at making a 3D engine using nothing but ASCII at the Windows Command Prompt. I was surprised how sophisticated you can be with just 200 lines of hastily written C++ code.
This video shows it off, talks about how it works, and you can grab the code from github, or visit my onelonecoder.com blog.

This video shows an implementation of, sigh, Flappy Bird in C++ at the command prompt.
Source: https://github.com/OneLoneCoder/videos/blob/master/OneLoneCoder_FlappyBird.cpp
Blog: http://www.onelonecoder.com
Twitter: @javidx9
Twitch: javidx9

A classic arcade game this week, I show you how to create a Frogger game using nothing but C++ and the command prompt. Specifically this video is about how much of a burden handling graphics becomes, and it can massively increase the size of your code base. All in all this simple Frogger game is about 150 lines of code. Also, I have a sore throat.
You can get the code here:
https://github.com/OneLoneCoder/videos/blob/master/OneLoneCoder_Frogger.cpp

And it's Go, Go, Go! This video shows how to create a simple retro style racing game in quick and simple C++. By using simple maths and rules, quite a complex game can be presented. I like the purity of this, underneath the rules are boring, but when presented as a racing game, the enjoyment of playing emerges. As usual, all you need is a command prompt!

The first video of my next big Code-It-Yourself! project! A top down role playing game in the style of Zelda and Final Fantasy. This video is long, but lays out the project plan and gets some of the fundamentals out of the way. It also introduces Object Oriented Programming techniques, that I use to make the whole thing much easier to develop as part of a team.
Shout outs to TomL, Itay, Stepanium and King from the Discord server for all their help with the graphics and tools.
Source: https://github.com/OneLoneCoder/videos/tree/master/olcRolePlayingGame
Blog: http://www.onelonecoder.com
Twitter: @javidx9
Twitch: javidx9

Cut Sequences and varied object behaviours are important facets of RPGs. In Part 2 of this series I present a way to manage many different types of interactive dynamic objects, and custom script them to facilitate "theatre". Please ensure you have seen part 1 first!
Source: https://github.com/OneLoneCoder/videos/tree/master/olcRolePlayingGame
Blog: http://www.onelonecoder.com
Twitter: @javidx9
Twitch: javidx9

Phew, almost done with this series now! In this video I introduce navigation, AI and quests to the role playing game. It's a bit code heavy this one, but I feel its an important step that shows how OOP (object oriented programming) can be exploited further to make developing reusable game assets very simple!
Source: https://github.com/OneLoneCoder/videos/tree/master/olcRolePlayingGame
Discord: https://discord.gg/WhwHUMV
Blog: http://www.onelonecoder.com
Twitter: @javidx9
Twitch: javidx9

That's it! The final video (of code) in this series. In this video I show how to implement items, inventory, weapons and combat. I'm done. I'm done with this project now!
Source: https://github.com/OneLoneCoder/videos/tree/master/olcRolePlayingGame
Blog: http://www.onelonecoder.com
Twitter: @javidx9
Twitch: javidx9

This video shows how to make a simple yet smooth tile-based 2D platform game, similar to classic offerings from older consoles. It uses nothing but the Windows Command Prompt to demonstrate robust collisions between the scenery and the player. All collisions are resolved using floating point truncation. No geometry.
Shout outs to Brankec on Discord (known as GearCode elsewhere) for the request.
Source: https://github.com/OneLoneCoder/videos/blob/master/OneLoneCoder_PlatformGame1.cpp
Blog: http://www.onelonecoder.com
Twitter: @javidx9
Twitch: javidx9
Discord: https://discord.gg/WhwHUMV

Even on my holidays I'm coding. Perhaps time to consider I have a problem? Anyway, this week I show you how to create a quick and simple game of Snake! using standard C++ and nothing else.
GitHub: https://github.com/OneLoneCoder/videos/blob/master/OneLoneCoder_Snake.cpp

This tutorial is a programmers entry point into sound synthesis. The code is available from my blog.
Source Code on GitHub: https://github.com/OneLoneCoder/synth/tree/master

This second video improves upon the basic waveform generators in the last video, to produce a flexible oscillator. The amplitude of the oscillator is now controlled by an Attack, Decay, Sustain, Release envelope, to produce some more realistic instrument sounds.
All the code is available from here: GITHUB: https://github.com/OneLoneCoder/synth/blob/master/main2.cpp

Program your own sound synthesizer! This part covers low frequency oscillators (LFOs), frequency modulation, instruments and polyphony.
The intro and outro themes are "Marble Machine" by Wintergatan.
All source code is available via github - click the link icon on my channel, or visit www.onelonecoder.com

A bit of a mixed bag this one! In this video, I discuss how to use the WaveOut API to deliver sound to the soundcard, and demonstrate how and why we need to buffer sound. I then show the synthesizer using a sequencer to emulate a snazzy drum machine.

I mentioned in an earlier video that programming a Tetris clone is a good way to get going with programming as it makes you think about algorithms. Putting my money where my mouth is, I went ahead and did just that.
GitHub: https://github.com/OneLoneCoder/videos/blob/master/OneLoneCoder_Tetris.cpp

The final part of my big project! Artificial Intelligence is given to the worms so they can destroy each other! Mwa ha ha... Anyway, here an AI state machine is used to allow the AI to manipulate the input controls instead of the player. It's a nice approach as it means the game and physics code is untouched.
Big thanks to MaGetzUb from the OneLoneCoder Discord Server for the track - it's awesome!
And for derivation of the projectile formula, this guy nails it: https://youtu.be/32PiZDW40VI
Source: https://github.com/OneLoneCoder/videos/blob/master/worms/OneLoneCoder_Worms3.cpp
Blog: http://www.onelonecoder.com
Twitter: @javidx9
Twitch: javidx9
Discord: https://discord.gg/WhwHUMV

A nice big project to end the year with! Split into several parts, I show you how to create a game similar to the classic Worms! Written from scratch, in C++
Source: https://github.com/OneLoneCoder/videos/tree/master/worms
Discord: https://discord.gg/WhwHUMV
Blog: http://www.onelonecoder.com
Twitter: @javidx9
Twitch: javidx9

A nice big project to end the year with! Split into several parts, I show you how to create a game similar to the classic Worms! Written from scratch, in C++
This Video: User Input, Cameras and State Machines
Source: https://github.com/OneLoneCoder/videos/tree/master/worms
Discord: https://discord.gg/WhwHUMV
Blog: http://www.onelonecoder.com
Twitter: @javidx9
Twitch: javidx9

Isometric Tile Map Rendering adds a lovely sense of depth to what is a static 2D construction. IN this video I show how to render and select cells in an isometric world.
Patreon: https://www.patreon.com/javidx9
YouTube: https://www.youtube.com/javidx9
https://www.youtube.com/javidx9extra
Discord: https://discord.gg/WhwHUMV
Twitter: https://www.twitter.com/javidx9
Twitch: https://www.twitch.tv/javidx9
GitHub: https://www.github.com/onelonecoder
Homepage: https://www.onelonecoder.com

A game engine entirely for the command prompt?
Firstly - Yes this video is not on my normal release schedule, secondly - DON'T PANIC!! I'm not radically changing my approach to videos, but I've created a little helper class to assist with some future videos - and thought it would be useful to have this video as a resource to reference. I've created a little "game engine" that only uses the command prompt - which allows me to focus the code to just the cool stuff, and less of the "boilerplate" code - drawing to screen, setting up resolutions etc...
github: https://github.com/OneLoneCoder/videos/blob/master/olcConsoleGameEngine.h

In this video I look at collisions between convex polygons, including rectangles. A quick examination of AABB (Axis Aligned Bounding Box) followed by SAT (Separated Axis Theorem) and an alternative I don't know the name of. As well as checking for overlap, I experiment with resolving the collisions statically.
YouTube: https://www.youtube.com/javidx9
https://www.youtube.com/javidx9extra
Discord: https://discord.gg/WhwHUMV
Twitter: https://www.twitter.com/javidx9
Twitch: https://www.twitch.tv/javidx9
GitHub: https://www.github.com/onelonecoder
Patreon: https://www.patreon.com/javidx9
Homepage: https://www.onelonecoder.com

Let’s continue building the world of our little cyborg detective boy! In this timelapse I provide some insight on composing a scene, a few more 1-Bit pixel art tips, and a look at constructing idle animations for character sprites!
(*ButActuallyIt’sKinda2-Bit)
————
Check out my art here:
https://instagram.com/brandonjamesgreer
————
Music during animation:
“Smooth” by Text Me Records / Bobby Renz
(w/ added water sounds effects)
All downloaded from the YouTube Audio Library
————
I commissioned other music in this video from these fantastic artists:
BJG title animation theme music by Failpositive:
http://failpositive.bandcamp.com/
https://twitter.com/failpositiv
Additional background music by mcguy215:

Before we build the 8-bit registers for our computer, let's design and build a 1-bit register.
The 8-bit registers we'll actually use in our 8-bit computer will be simplified. We're going to take a big shortcut—using the 74LS173—described at the end of this video. But before we get to that, this video shows how we could build a 1-bit register using more basic components.
Support me on Patreon: https://www.patreon.com/beneater
You can get all the components used in this video from any online electronic components distributor for a few dollars. See https://eater.net/bbcpu8-registers for more.
Complete parts list (everything in this video):
- Clock circuit from https://youtu.be/SmQ5K7UQPMM
- 1x 74LS04 (Hex inverter)
- 1x 74LS08 (Quad AND gate)
- 1x 74LS32 (Quad OR gate)
- 1x 74LS74 (Dual D flip-flop)
- 1x LED
- 22 gauge wire
- 5 volt power source (e.g., a USB phone charger)

Twitter: https://twitter.com/GreatScottLab
Facebook: https://www.facebook.com/greatscottlab
Previous video:http://youtu.be/9LjfkjwMqXI
Parts (affiliate links):
Bluetooth module: http://amzn.to/1f3nUyT
Arduino Nano: http://amzn.to/1d4H1w1
Aliexpress:
Bluetooth module: https://s.click.aliexpress.com/e/_dW5NVmJ
Arduino Nano: https://s.click.aliexpress.com/e/_dULoNXh
Arduino Sketch: http://www.mediafire.com/download/hx9kysd5vxhxuvv/ArduinoBluetoothGreatScott!.rar
Adding bluetooth to your arduino project is simple and super awesome. I will show you how to control your gadgets with your android smartphone.
Music:
Killing Time, Kevin MacLeod (incompetech.com)

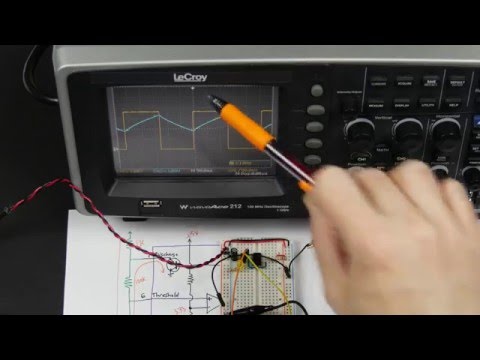
A fast, simple, reasonably portable way of approximating the Sine function. I'm using it for hi-speed audio synthesis on embedded platforms that don't have dedicated silicon resources for computing trigonometric functions. I show both a quadratic and cubic approximation, yielding subtly square wave and saw-tooth wave results.
Simple Maths Error @5m 50s, should be +8x. Oops :-)

The unimaginable evil of C++ is unleashed. Be afraid. Global Variables, Macros, Void*, Goto, Namespace STD, New & Delete, all the tools every C++ programmer needs... right?
Patreon: https://www.patreon.com/javidx9
YouTube: https://www.youtube.com/javidx9
https://www.youtube.com/javidx9extra
Discord: https://discord.gg/WhwHUMV
Twitter: https://www.twitter.com/javidx9
Twitch: https://www.twitch.tv/javidx9
GitHub: https://www.github.com/onelonecoder
Homepage: https://www.onelonecoder.com

Let's have a very quick look at Git and Github - Git is an enormous topic, so this won't be an exhaustive tutorial but by the end of it we'll have a working knowledge of basic git workflow.
Full tutorial - https://core-electronics.com.au/tutorials/maintaining-a-project-with-git.html
Core Electronics is your home in Australia for:
Raspberry Pi https://core-electronics.com.au/raspberry-pi.html

In this (long, sorry) video I cover a variety of things to implement a classing line-of-sight mapping, or shadow casting depending on your perspective. It's also the first olc::PixelGameEngine project I've done a video for, so I spend some time showing you how to set up Visual Studio to use this engine. I'm quite pleased with the end result of these algorithms and I expect to use them quite a bit in more ambitious tile-based projects in the future.
These resources are excellent regarding the things seen in the video:
https://stackoverflow.com/questions/563198/how-do-you-detect-where-two-line-segments-intersect
https://www.redblobgames.com/articles/visibility/
https://ncase.me/sight-and-light/
Blog: http://www.onelonecoder.com
Twitter: @javidx9
Twitch: javidx9

Our computer's clock is built using several 555 timers. The second is configured as a basic monostable circuit to debounce a pushbutton. See https://eater.net/bbcpu8-clock-module for more.
Part 1: https://youtu.be/kRlSFm519Bo
Part 3: https://youtu.be/WCwJNnx36Rk
Part 4: https://youtu.be/SmQ5K7UQPMM
Support me on Patreon: https://www.patreon.com/beneater
You can get all the components used in this video from any online electronic components distributor for a few dollars.
Complete parts list (everything in this video):
- Circuit from part 1
- 1x 555 timer IC
- 1x 1kΩ resistor
- 1x 1MΩ resistor
- 1x 330Ω resistor
- 1x 2µF capacitor
- 1x 0.1µF capacitor
- 1x 0.01µF capacitor
- 1x Momentary "Microtivity 6mm tact switch"
- 1x LED
- 22 gauge wire

In this video, I take a simple look at operator overloading in C++, and implement a 2D vector type. I then turn this type into a template to accommodate different precision requirements.
Source: https://github.com/OneLoneCoder/videos/blob/master/OneLoneCoder_OperatorOverloading.cpp
Blog: http://www.onelonecoder.com
Twitter: @javidx9
Twitch: javidx9

In this video I look at an alternative to A* algorithm for finding shortest paths. Information can be propagated relating to distance along a wavefront, that ripples across an isomorphic data structure.
Patreon: https://www.patreon.com/javidx9
Blog: http://www.onelonecoder.com
Twitter: @javidx9
Twitch: javidx9

A tricky one to do a video about this, but here is an tutorial implementation of the A* path finding algorithm, programmed in C++, running at the command prompt.
Lol, forgot the source: https://github.com/OneLoneCoder/videos/blob/master/OneLoneCoder_PathFinding_AStar.cpp
Blog: www.onelonecoder.com

Decided to challenge myself this week and create some art that had a bit more 'dimension' to it! Join me as I work my way through pixel art construction with perspective!
————
Check out my art here:
https://instagram.com/brandonjamesgreer
————
Music during CRT Time sequence:
“Take You Home” by Silent Partner
Downloaded from the YouTube Audio Library
————
I commissioned other music in this video from these fantastic artists:
BJG title animation theme music by Failpositive:
http://failpositive.bandcamp.com/
https://twitter.com/failpositiv
Additional background music by mcguy215:

Polymorphism is a powerful yet potentially confusing feature of C++. In this video I create a simple Computer Aided Design (CAD) application that exploits polymorphism to keep the application simple yet highly customiseable.
YouTube: https://www.youtube.com/javidx9
https://www.youtube.com/javidx9extra
Discord: https://discord.gg/WhwHUMV
Twitter: https://www.twitter.com/javidx9
Twitch: https://www.twitch.tv/javidx9
GitHub: https://www.github.com/onelonecoder
Patreon: https://www.patreon.com/javidx9
Homepage: https://www.onelonecoder.com
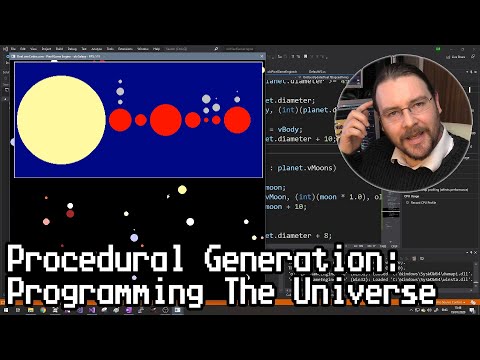
In this video I look at how we can manipulate randomness to generate coherent and well formed structures on demand, which allows truly vast and complex resources to be created with no effort from a designer
Patreon: https://www.patreon.com/javidx9
YouTube: https://www.youtube.com/javidx9
https://www.youtube.com/javidx9extra
Discord: https://discord.gg/WhwHUMV
Twitter: https://www.twitter.com/javidx9
Twitch: https://www.twitch.tv/javidx9
GitHub: https://www.github.com/onelonecoder
Homepage: https://www.onelonecoder.com

Put down the keyboard!
There is nothing worse that using code that has been written to some arbitrary set of standards in the guise of professionalism. Often due to inexperience, or the urge to just keep on trucking, some coders make a complete mess of otherwise perfectly acceptable code.
Source Code: https://github.com/OneLoneCoder/videos/blob/master/OneLoneCoder_OverEngineered.cpp
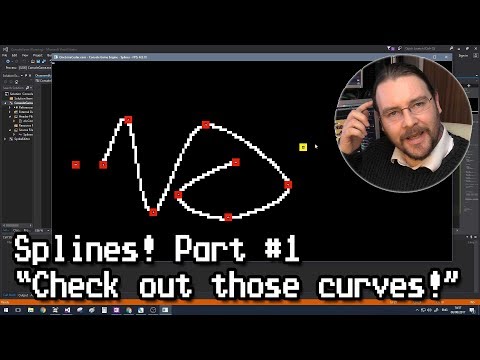
Splines, in this case Catmull-Rom splines, offer a simple way to have curves in your applications. This video explores the programming to use spline paths and loops that go through all control points yielding an effective way to have more natural NPC AI behaviour.
Github: https://github.com/OneLoneCoder/videos/blob/master/OneLoneCoder_Splines1.cpp

A direct follow on from Splines Part 1, in this video we look at how to move objects around a spline at a constant(ish) velocity. This approach is an approximation but it is good enough for games, and in particular, non-player character motion.
It also shows the costs associated with using splines, but most of these costs can be mitigated by only calculating what you need, and when things change.
Source: https://github.com/OneLoneCoder/videos/blob/master/OneLoneCoder_Splines2.cpp
Blog: www.onelonecoder.com

Simplicity often masks Complexity in programming. This video shows an extremely easy to use, flexible pop-up menu system, but the engineering behind it is quite complicated in a nerdy, elegant way. I use maps, vectors, recursion, references and operator overloading to implement a retro-style, skinnable menu system.
Source: https://github.com/OneLoneCoder/olcPixelGameEngine/blob/master/Videos/OneLoneCoder_PGE_RetroMenu.cpp
Patreon: https://www.patreon.com/javidx9
YouTube: https://www.youtube.com/javidx9
https://www.youtube.com/javidx9extra
Discord: https://discord.gg/WhwHUMV
Twitter: https://www.twitter.com/javidx9
Twitch: https://www.twitch.tv/javidx9
GitHub: https://www.github.com/onelonecoder
Homepage: https://www.onelonecoder.com

Here I show the first in a series of videos implementing a simple collision detection and resolution system. Specifically, this system works with circles, and I show how to resolve two circles interacting with each other in a plausible way. Quick and Simple C++ in the Command Prompt.
Source: https://github.com/OneLoneCoder/videos/blob/master/OneLoneCoder_Balls1.cpp
Blog: http://www.onelonecoder.com
Discord: https://discord.gg/WhwHUMV
Twitter: @javidx9
Twitch: javidx9

Better Balls! This video continues looking a a circle physics based engine, and implements a more accurate method for tracking time during the simulation, and implements arbitrary edge objects that can be used to displace and deflect balls. All using the olcConsoleGameEngine at the command prompt.
Source: https://github.com/OneLoneCoder/videos/blob/master/OneLoneCoder_Balls2.cpp
Blog: http://www.onelonecoder.com
Twitter: @javidx9
Twitch: javidx9
Discord: https://discord.gg/WhwHUMV

Maintain Peak Programming Performance with these helpful exercises!
Blog: http://www.onelonecoder.com
Twitter: @javidx9
Twitch: javidx9
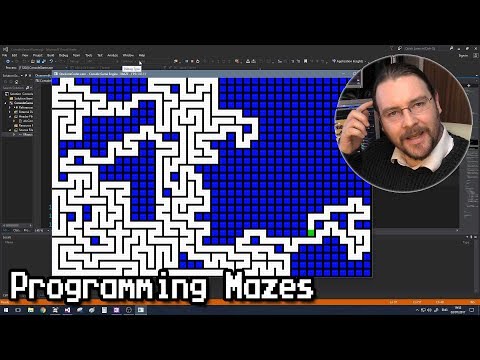
I'm tired, hot and sun-burnt, holidays are never that relaxing. Anyway, here I introduce one of my favorite algorithms - the Recursive Back-tracker, to generate a maze. I love how perfectly complete this algorithm is, it can be used in all situations where you need to guarantee your network has all paths traversed. It's also my first video with the olcConsoleGameEngine class, so it's a bit of an experiment.
GitHub: https://github.com/OneLoneCoder/videos/blob/master/OneLoneCoder_Mazes.cpp

A genuinely practical video today! In this video, I take a look at a really useful technique to easily add panning and zooming to your applications.
Source: https://github.com/OneLoneCoder/videos/blob/master/OneLoneCoder_PanAndZoom.cpp
Blog: http://www.onelonecoder.com
Twitter: @javidx9
Twitch: javidx9

NOTE! This is an approximation of Perlin Noise! :-S
Noise is at the root of most procedurally generated content. However, just choosing random numbers alone is insufficient. Perlin noise adds local coherence over different scales to generate natural looking formations, which can be further processed into assets for all sorts of algorithms and games. This video shows 1D and 2D Perlin noise being created and displayed at the command prompt.
Source: https://github.com/OneLoneCoder/videos/blob/master/OneLoneCoder_PerlinNoise.cpp
Blog: http://www.onelonecoder.com
Twitter: @javidx9
Twitch: javidx9

In this video I look at some very simple code that emulates a 3D environment, popularised by the Super Nintendo, known as MODE7. This approach looks at how we can project a frustum into a texture to give a compelling pseudo 3d experience.
Source: https://github.com/OneLoneCoder/videos/blob/master/OneLoneCoder_Pseudo3DPlanesMode7.cpp
Discord: https://discord.gg/WhwHUMV
Blog: http://www.onelonecoder.com
Twitter: @javidx9
Twitch: javidx9
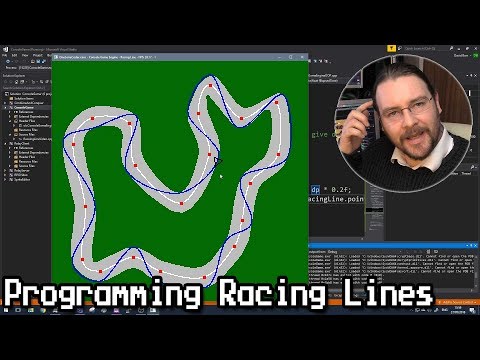
Back to normal! In this video I examine a framework to experiment with different racing lines along a parametric track.
Source: https://github.com/OneLoneCoder/videos/blob/master/OneLoneCoder_RacingLines.cpp
Blog: http://www.onelonecoder.com
Twitter: @javidx9
Twitch: javidx9

In this video, we test the register we built in the last video (https://youtu.be/CiMaWbz_6E8) and connect it to two more registers like it.
After this video, we'll have three registers built and tested:
- A register
- B register
- Instruction register
Support me on Patreon: https://www.patreon.com/beneater
You can get all the components used in this video from any online electronic components distributor for a few dollars. See https://eater.net/bbcpu8-registers for more.
Complete parts list (everything in this video):
- Clock circuit from https://youtu.be/SmQ5K7UQPMM
- 6x 74LS173 (4-bit D-type register)
- 3x 74LS245 (Octal bus transceiver)
- 32x LEDs
- 22 gauge wire
- 5 volt power source (e.g., a USB phone charger)
How can we represent negative numbers in binary? There are several ways. This video compares using a sign bit, ones complement, and twos complement. Twos complement is the most commonly technique because it's relatively easy to implement in hardware and it makes addition and subtraction with negative numbers easy.
Support me on Patreon: https://www.patreon.com/beneater

One of my first videos was a First Person Shooter like engine that ran in the command prompt. I felt it was time to revisit it and update the graphical qualities of the engine. It's important that you watch the first video before this one.
Source: https://github.com/OneLoneCoder/videos/blob/master/OneLoneCoder_ComandLineFPS_2.cpp
Blog: http://www.onelonecoder.com
Twitter: @javidx9
Twitch: javidx9

A bit different from me, but I felt like I needed a reference video that explained a few things about pointers. Included are the very basics, memory allocation, problems to avoid and smart pointers.
This video is aimed at those earlier on with their programming journeys.
Blog: http://www.onelonecoder.com
Twitter: @javidx9
Twitch: javidx9

In this video, we’ll walk through the best options for pixel art software! Below are links to purchase/download each of the programs mentioned in this video:
=== PAID PROGRAMS (0:56) ===
ASEPRITE (0:56)
https://store.steampowered.com/app/431730/Aseprite/
PYXEL EDIT (2:08)
PRO MOTION NG (3:25)
https://store.steampowered.com/app/671190/Pro_Motion_NG/
ADOBE PHOTOSHOP (4:12)
https://adobe.com/creativecloud.html
=== FREE PROGRAMS (5:31) ===
GIMP (5:31)
KRITA (6:37)
GRAPHICSGALE (6:53)
GRAFX2 (7:13)
PIKO PIXEL (7:36)
http://twilightedge.com/mac/pikopixel/
PISKEL (7:56)
LOSPEC PIXEL EDITOR (8:16)
https://lospec.com/pixel-editor/app
=== FINAL VERDICT/RECOMMENDATIONS (8:40) ===
————
Check out my art here:
https://instagram.com/brandonjamesgreer
————
I commissioned the music in this video from these fantastic artists:
Title sequence theme music by Failpositive:
http://failpositive.bandcamp.com/
https://twitter.com/failpositiv
All other background music by mcguy215:

Ok sure, a pixel is one square…but how many of them should you use to make pixel art? In this video, we walk through a few different sizing options based on retro video games to give you an idea of where to start!
————
Check out my art here:
https://instagram.com/brandonjamesgreer
————
I commissioned the music in this video from these fantastic artists:
Title sequence theme music by Failpositive:
http://failpositive.bandcamp.com/
https://twitter.com/failpositiv
All other background music by mcguy215:

The ultimate Arduino tutorial for beginners. Learn how to choose an Arduino, dim LEDs, build a motor speed controller and more. Sponsored by Audible - Get a free 30 day trial & download one free title: http://www.audible.com/afrotechmods
Example UNO kit: http://amzn.to/2mRjqLa
Example UNO robot kit: http://www.amazon.com/exec/obidos/ASIN/B07KPZ8RSZ/afromods-20
Website: http://www.afrotechmods.com
Twitter: http://twitter.com/Afrotechmods
Facebook: http://www.facebook.com/Afrotechmods/
If you are feeling extra generous, bookmark this link and use it as your Amazon home page:
http://www.amazon.com/?_encoding=UTF8&camp=1789&creative=9325&linkCode=ur2&tag=afromods-20
If you do that, I get a percentage of everything you buy, and you don't have to spend an extra dime!
#Arduino #Science #Engineering
