Wolf5k

Wolf5K comes preobfuscated which is a way to both confuse those who would like to view your code and also to save space. If you don't understand how to read source code then there's no point in even attempting to understand how Wolf 5K works without some help. This is my attempt to deobfuscate the code and explain to you how the author did it. The purpose for this is that the goal of doing software rendering isn't to show how to make polygons (which is pretty easy as you've found out). The real goal is to show how to do ray tracing. Something modern hardware can't do on it's own. Ray Tracing is an extension of Ray Casting which is what Wolfenstein 3D, DooM and others used before 3D hardware was mainstream. Ray Tracing is what is used to render movies like Toy Story and Shrek. So we're going to use Wolf 5K to learn how to do Ray Casting and then we're going to move into PHP to reimplement the concepts learned here and then learn how to do Ray Tracing and get into some very advanced stuff.
The first step to deobfuscating code is to restore whitespace. Once that step is complete we can begin trying to figure out what all these very nondescript variables do. The first set of variables are as follows:
N6=8184;

N5=2040;

N4=1008;

N3=4092;

N2=65535;

N1=2340;

N0=1032;


And doing a text search with TextPad we find that

they are used in the variable...


bm=[[N2,128,448,128,N2,14336,4096,14336,N2,14,4,14,N2,448,128,448],

	[N2,53259,40965,49155,32865,32913,37505,35457,34417,

		35345,37617,33281,49667,40965,53259,N2],

	[N5,1224,720,7928,4740,32740,65508,1088,N4,N0,2244,N1,2052,N1,N0,N4],

	[N6,4104,12680,12680,6120,6120,4488,4488,4104,N6],

	[N6,N6,N6,N6,N6,N6,N6,N6,N6,N6],

	[N5,N5,0x3f0,N6,8188,32764,65532,18424,N4,N5,N3,N3,N3,N3,N5,N4],

	[5136,5136,2592,2592,1088,1984],

	[8176,8176,4064,4064,1984,1984],

	[N4,N0,N1,2052,N1,2244,N0,N4],

	[N4,N5,N3,N3,N3,N3,N5,N4],

	[0,0,0,0,0,2080,6096,9544,2336,256]];
bm is a two dimensional array. The first thing we do is search and replace the variables names with the values. We now have:
//bm is our "Bitmap" of tiles

bm=[

	[65535,128,448,128,65535,14336,4096,14336,

	65535,14,4,14,65535,448,128,448], //wall


	[65535,53259,40965,49155,32865,32913,37505,35457,

	34417,35345,37617,33281,49667,40965,53259,65535], //5K wall tile


	[2040,1224,720,7928,4740,32740,65508,1088,1008,1032,

	2244,2340,2052,2340,1032,1008], //enemy


	[8184,4104,12680,12680,6120,6120,4488,4488,4104,8184], //health


	[8184,8184,8184,8184,8184,8184,8184,8184,8184,8184], //health mask


	[2040,2040,0x3f0,8184,8188,32764,65532,18424,1008,

	2040,4092,4092,4092,4092,2040,1008], //enemy mask


	[5136,5136,2592,2592,1088,1984],//gun


	[8176,8176,4064,4064,1984,1984],//gun mask


	[1008,1032,2340,2052,2340,2244,1032,1008], //dead enemy


	[1008,2040,4092,4092,4092,4092,2040,1008],	//dead enemy mask


	[0,0,0,0,0,2080,6096,9544,2336,256] //gunfire

   ];
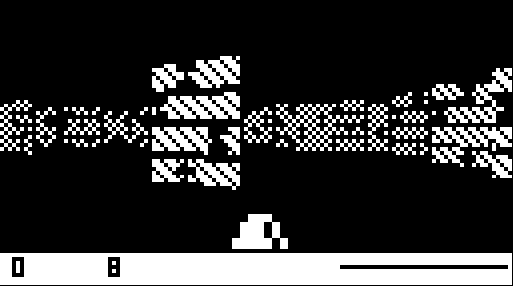
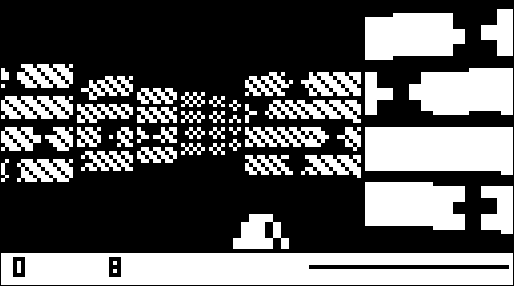
Decoding the binary values we get the sprites you see off to the left. You can see that there are solid black versions of most of the sprites. In the prior tutorials when we wanted a transparent pixel we used the pixel value of 2. Since the author of Wolf5K is trying to conserve space he opted to use a mask in order to be able to stick to pure binary. What happens then is that only if the pixel in the mask is black is the corresponding pixel in the sprite drawn. Masking is a very common way of doing color keying and alpha blending. In the original Wolfenstein 3D the authors used a color key rather than a mask. DooM also made use of a colorkey. Using a color key avoids the need to create masks which can be very tedious. If someone wants to modify a graphic they then also have to update the mask. But it comes at the expense of not being able to display a certain color. In Wolf 3D they used the pink that is seperating the tiles to the left as the colorkey.
When you first start Wolf 5K you see a black background with a white bar at the bottom. This is accomplished using the following code:
	...

	M=_=H=hl=64;

	...


	p1=P(1152);

	for(i=0;i<1152;i++)

		p1[i]=i>=H*16?255:0;


	...

	function P(a){return a?new Array(a):[]}
Using H takes up less space than the number 64 which it represents. P is a function which returns an array of size a. This takes up less space than using new Array(a) everywhere. Deobfuscated the function looks like so:
	//the function formerly known as P

	function CreateArray(a)

	{

		return a?new Array(a):[]

	}


	BlankScreen=CreateArray(1152);

	for(i=0;i<1152;i++)

	{

		if(i>=1024)

			BlankScreen[i]=255;

		else

			BlankScreen[i]=0;

	}
p1 become BlankScreen and the since line in the loop is expanded so it's easier to see what's going on. Just like all the other tutorials the screen is stored in bits. The Wolf5K action screen is 128 pixels by 64 pixels. 128/8*64 = 1024. So the first 1024 blocks of pixels are then set to 255 (8 pixels of 1) and the last 8 rows are set to 0. We're inverting things again so 1 is black and 0 is white. This default background is then stored in it's own array. Before any rendering is done, this array is copied into the back buffer. In our code we simply fill the back buffer with a value in order to get a solid pattern.
And finally for this tutorial we'll decode the section of the source which handles plotting pixels and showing the user the final render. The following is the original code.
	function Y(x,y,v)

	{

		var Q=y*16+(x>>3);

		x=1<<(x&7);

		p[Q]=v?p[Q]&(255-x):p[Q]|x

	}


	function X(cz)

	{

		for(i in p)

			b[i]=N[cz?0:255-p[i]];

		z="#define t_";

		im=z+"width "+W+"\n"+z+"height "+

			(H+8)+"\nstatic char t_bits[] = {"+b.join(",")+"}";

		d.images[0].src=cz==2?"r.gif":"javascript:"+($x++)+";im;"

	}
function Y handles plotting a pixel and function X handles showing the screen. cz is passed in to determine which screen to show. If cz is 2 then r.gif is shown which is a gif file consisting of a single red pixel stretched to the viewing area by HTML. No fancy tricks there. The red is flashed whenever the player is shot by the enemy. If cz is not 2 then the rendered frame is shown. When the code is deobfuscated it looks like the below:
	function PlotPixel(x,y,v)

	{

		var Q=y*16+(x>>3); //Q = y * 16 + (unsigned int)x/8

		x=1<<(x&7);  //equivelent to: Math.pow(2,x%8);

		p[Q]=v?p[Q]&(255-x):p[Q]|x;

	}


	function ShowScreen(cz)

	{

		for(i in p)

			b[i]=N[cz?0:255-p[i]];

		z="#define t_";

		im=z+"width "+W+"\n"+z+"height "+

			(H+8)+"\nstatic char t_bits[] = {"+b.join(",")+"}";

		d.images[0].src=cz==2?"r.gif":"javascript:"+($x++)+";im;"

	}
You can see that the pixel plotting function used by Wolf5K is functionally identical to the one used
by all my tutorials. The Wolf5K author simply uses the equivent bit operators instead of mod. If
possible it's best to use bit operators because they're much faster than standard math operations.
x&7 is equivelent to x%8 and 1<
Comparing the logic for actually storing the new pixel we can see that it's identical.
In Wolf5K, v is the color of the pixel. If it's 0 then the AND operation is performed and if it's non
zero then the OR operation is performed. This is just simply the way to do it. My version is just
easier to read. And now to compare the way we show the user the final screen:
b in Wolf5K is the array which holds the hex representation of the screen bytes. I use the variable
name conv. Since I borrowed the code from Wolf5K it's not so surprising these two functions are
virtually identical. Again, there's really not another way to do this. There are some things in
programming that can only be done one way.
The main difference between my way and Wolf 5K's way is that Wolf5K uses much tighter code. It needs to
be since the goal is being very small and running fast. The goal of my tutorials is to be educational
and that often requires doing things the slower way. When we get into more advanced lessons we'll
start dealing with some optimization tricks. In the next lesson we'll cover how Wolf 5K displays the
numbers on the screen and explain some more of the cryptic variables among other things.
	//my code

	if(c>0) // set the pixel bit to 1

		screen[Math.floor(x/8) + y*screenW/8] |= Math.pow(2,x%8);

	else // set the pixel bit to 0

		screen[Math.floor(x/8) + y*screenW/8] &= 255-Math.pow(2,x%8);


	//Wolf5K

	p[Q]=v?p[Q]&(255-x):p[Q]|x;
	//my way

	function render()

	{

		var conv = [];

		var x,y;

		for(y=0;y<240;y++)

			for(x=0;x<screenW/8;x++)

				conv[x+y*screenW/8] = N[255-screen[x+y*screenW/8]];

		//send the result into the document image

		z="#define pic_";

		im=z+"width "+screenW+"\n"+z+"height "+

			screenH+"\nstatic char pic_bits[] = {"+conv.join(",")+"}";

		document.screen.src="JavaScript:"+frame+";im;";

	}


	//Wolf5K

	function ShowScreen(cz)

	{

		for(i in p)

			b[i]=N[cz?0:255-p[i]];

		z="#define t_";

		im=z+"width "+W+"\n"+z+"height "+

			(H+8)+"\nstatic char t_bits[] = {"+b.join(",")+"}";

		d.images[0].src=cz==2?"r.gif":"javascript:"+($x++)+";im;"

	}
In this tutorial we're going to start out explaining how Wolf5K displays the level number, points, monsters left and health meter. What I call FontMap is A5 in the original code. It's actually pretty simple. For this tutorial I'm not going to bother showing the original code. It's exactly the same but with sometimes different function and variable names and no white space.
	FontMap=[

		7,5,5,5,7, //0			//Sample font number 9

		1,3,1,1,1, //1			//111

		7,1,7,4,7, //2			//101

		7,1,7,1,7, //3			//111

		5,5,7,1,1, //4			//100

		7,4,7,1,7, //5			//100

		7,4,7,5,7, //6

		7,1,1,1,1, //7

		7,5,7,5,7, //8

		7,5,7,1,1];//9
The author of Wolf5K made some seemingly odd decisions about how to store the graphics. In the wall and sprite tiles the bits go as such: 1 2 4 8 16 ... while the bits for the font go from ... 16 8 4 2 1. They also are not stored upside down. So for the tiles, they are vertically flipped and the fonts, they are horizontally flipped. The reason for the vertical flip is actually to avoid needing additional rows of transparent pixels.
functions A6 and A7 are used to actually draw the fonts onto the screen. A6 handles the entire number and A7 actually draws each individual digit. I've renamed the functions DrawNumber and DrawDigit.
	//number rendering function

	//$a is the number

	//$m is the x coordinate to draw at

	//$k is the y coordinate to draw at

	//r determines whether to invert the colors

	// of the number

	function DrawNumber(a,$m,$k,r) //A6()

	{

		//if the number is less than 1 then just draw 0

		if(a<1)

		{

			DrawDigit(0,$m,$k)

		}

		else

		{

			//this formula returns the approx number of digits in the number

			//if a is 898 then log(a)/log(10) (where log is the natural log)

			//is equal to ~2.9 with the floor puts it at 2. 10^2 is 100.

			//898/100 is 8.98 and the floor reduces it to 8 which is the

			//value of the digit we were looking for.  We then subtract

			//800 from the original value and go to the next digit

			for(i=Math.floor(Math.log(a)/Math.log(10));i>=0;i--,$m+=4)

			{

				var t=Math.pow(10,i);

				var j=Math.floor(a/t);

				DrawDigit(j,$m,$k,r);

				a-=j*t;

			}

		}

	}
r is a very handy variable. The level number is drawn white on black while status information is drawn black on white. By passing in r it avoids any unneccessary redundancy. The comments in the code explain pretty well how the number rendering function works.
	//this function draws individual digits

	function DrawDigit(a,$m,$k,r) //A7()

	{

		for(k=0;k<5;k++)//there are five rows of pixels per number

		{

			var d=FontMap[a*5+k]; //get the numeric value for the row of pixels

			if(r)//if r is non zero then invert the color of the pixels

			{

				d=7-d;

			}

			//each row has three pixels.

			//&4 is the first pixel

			//&2 is the second pixel

			//&1 is the third pixel

			//apparently this guy is used to working with big endien systems.

			//"normally" binary is 1 2 4 8 16 32 ... etc

			//this is working with etc ... 32 16 8 4 2 1

			PlotPixel($m+1,$k+k,d&4);

			PlotPixel($m+2,$k+k,d&2);

			PlotPixel($m+3,$k+k,d&1)

		}

	}
This function is also pretty straight forward. It simply scans the font map and plots the pixels. d&4 etc selects the color of the pixel in that binary position. You can see this is where the bits are drawn backwards on account of storing the font information backwards. If the author had stored the bits in the "correct" direction it would be just a subtle change to the code as follows:
			PlotPixel($m+1,$k+k,d&1);

			PlotPixel($m+2,$k+k,d&2);

			PlotPixel($m+3,$k+k,d&4)
And that concludes this lesson. You can see that we are starting with the easier functions which allows us to eliminate a lot of code so we are less likely to be confused when we start dealing with the more complicated things. Process of elimination is very important when trying to understand other people's code. Especially when it's as garbled up at Wolf5K's.
Figuring out how user input is processed starts with looking at the body tag.
	<body onload="

				Start();

				i=window;

				if(IsNetscape)

				{

					ce=captureEvents;

					ce(256);

					ce(512);

				}

				else

					i=d;

				i.onkeydown=KeyDown;

				i.onkeyup=KeyUp;

				setInterval(tk,50)

	">
KeyDown and KeyUp are the function that are called whenever the onkeydown and onkeyup events are triggered. Netscape handles this differently than Internet Explorer. There's really nothing involved here that isn't browser related. In other words, not particulary important unless you are working with JavaScript. setInverval should be familiar since we've been using that since the first lesson. tk then is the main function and is called every 50ms. KeyDown and KeyUp are functions K and L in the original Wolf5K source.
Since it's shorter we'll start with the KeyUp function.
	//onkeyup function

	function KeyUp(e) //L()

	{

		Z=IsNetscape?e.which&223:event.keyCode;

		if(Z==74||Z==76) //74 => J 76 => L

			U=0;

		if(Z==75||Z==77) //75 => K 77 => M

			fwd=0

	}
The corresponding key codes are shown in the comments for the source. The binary operation of &223 is just a browser thing. U is the variable that tells the program if the user is rotating and how much. fwd tells the program if the user is moving and how much. This function checks to see if the user let up the corresponding key and then zeros the variable so that the user stops rotating or moving. The next function handles the user pressing a key.
	//onkeydown function

	function KeyDown(e) //K()

	{

		Z=IsNetscape?e.which:event.keyCode;

		if(!playerDead&&Z==32&&!frameDelay) //32 => space

		{

			DrawSprite(10,10,H-32,W/2-16,H,W/2+16,0,1);

			ShowScreen();

			for(i in $h)

			{

				var o=$h[i];

				if(o.i&&!o.z&&o.lW/2&&o.c==1)

				{

					o.z=1;

					numKilled++;	//numKilled is the kill count

					playerPoints+=10*(gameLevel+Math.floor(o.d/64))

				}

			}

			M=1

		}


		Z=Z&223; 	//223 => 11111011 - 32 is masked out so we do this

					//here, after space is checked for


		U=Z==74?12:Z==76?-12:U;  //if J is pressed rotate 12 degrees,

					//if L is pressed rotate -12 degrees


		if(!playerDead&&Z==75) //75 => K - UP

			fwd=64/3;

		if(!playerDead&&Z==77) //77 => M - DOWN

			fwd=-64/3;

	}
The KeyDown function is pretty much the same as the KeyUp function except that we care if the player is dead or not. If the player is dead then they can only rotate the view. I don't know why the mask of 223 is used for Netscape but it masks out key 32 which is the spacebar which we happen to need. Spacebar is a special case. The first thing it does is draw the gun shot sprite and then show the user the result. We'll cover how the DrawSprite routine works in another tutorial. We then have to loop through all the objects and see if we hit any of them. You'll notice the loop doesn't exit just because we found a monster we killed. "Bullets" shoot as far as we have line of sight and kill every monster in its path. If 10 monsters were lined up in front of you and you fired, you'd kill all of them with a single shot.
o.i is the object type. 0 is a health kit and 1 is a monster. If o.z is 1 then the monster is dead or the health kit is not visible. o.l and o.r are the left and right sides of the object. If the monster is about the middle of the screen (and therefore right in front of the player) then we check o.c which tells us if the monster is visible to the user or not. If o.c is 1 then the player can see the monster. If all these checks are passed then we set o.z to 1 indicating it's dead, increment the number of killed monsters and give the player some points based on the level and the distance of the monster from the player. Shooting a monster farther away gets you more points. Setting M to 1 indicates that something has changed and the program redraws the view area when it checks for the value of M. I'm not sure exactly why this is in here. It just avoids drawing redundant frames but I don't see how that actually matters.
Next the input is masked for some reason I'm not aware of and then U is modified if the user presses the appropriate key and then fwd is modified if specific keys are pressed. The final step is to apply the values of U and fwd to the player's position. This is done in the tk function which we will cover in more detail in a later tutorial.
	if(U) //if we are rotating adjust the rotation angle

	{

		playerRotation-=U*RAD;  //playerRotation is the players view angle

		M=1			//M=1 indicates we need to update the screen

	}

	if(fwd) //if we are moving forward/backwards

	{

		//store the new coordinates in temporary variables

		var c8=playerX+fwd*Math.cos(playerRotation);

		var c9=playerY+fwd*Math.sin(playerRotation);


		if(!IsNotValidLocation(c8,c9)) //if we have not collided with anything

		{

			playerX=c8; //set the players location to the new location

			playerY=c9;

			M=1		//we moved so update the screen

		}

	}
In one of the first lessons we did, a dot moved using the same math we see here. We can use this simple formula here because the map is not actually moving or rotating. IsNotValidLocation returns a 1 if the player is outside the bounds of the map or standing in a wall tile. Collision detection doesn't get any simpler than this. This function is called "$" in the original code.
	//this returns the maps wall value at x,y

	//a one indicates we hit a wall

	function IsNotValidLocation(x,y)

	{

		x=Math.floor(x/64);//we divide by 64 to figure out

					//which tile of the map we are on

		y=Math.floor(y/64);


		//if we are out of bounds return one,

		//otherwise return the value of the wall

		//we are storing the map in bits so we do

		//the &2^x trick to get the bit of the wall

		//array value

		return(x<0||y<0||x>15||y>15)?1:(w[y]&1<<x)

	}
And that concludes this lesson. You now know how input is handled by Wolf5K and how the player moves around the map and shoots things. There are only about 4 functions left to cover. Most of the code has been eliminated and we havn't even touched drawing sprites or ray tracing yet. In the next lesson we'll cover drawing sprites, the Start function ("S" in the original code), and introduce you to the Z buffer.
We'll start off by explaining how the DrawSprite routine works. In the original code it's function I. The parameters are renamed but the order is the same.
	//this is the function which renders the sprite

	//tile is the sprite number, mask is the mask number

	//r determins if we are inverting the colors

	//$f tells the function if this is a sprite or or wall

	function DrawSprite(tile,mask,sy,sx,dy,dx,$f,r)

	{

		var ht=Math.abs(dy-sy);

		var wd=Math.abs(dx-sx);

		var $g=0;

		var pY;

		var pX;

		var clr;

		var msk;


		if(sy<0)

			sy=0;

		if(dy>=H)

			dy=H-1;

		for(k=sx;k<dx;k++) // drawing from left to right

		{

			//if $f is zero then we draw as long as it is on the screen

			//otherwise check zBuffer which holds scanline information

			//for visibility, if something already occupies the buffer at

			//a closer depth then we know that whatever we were

			//attempting to draw is hidden so we do not draw it

			if(k>=0&&k<=W&&!($f&&($f>zBuffer[k])))

			{

				//what pixel in the sprite we are looking at

				pX=Math.floor((k-sx)/wd*16)&15;


				for(j=sy;j<dy;j++) // and then top to bottom

				{

					// the y line of the sprite

					pY=15-Math.floor((j-sy)/ht*16);


					//actual color

					clr=bm[tile][pY]&1<<pX;


					//value of the mask

					msk=bm[mask][pY]&1<<pX;


					//if the mask is non zero plot the

					//actual color (black is 1 in the bm)

					if(msk)

					{

						PlotPixel(k,j,clr?!r:r);

						$g=1

					}

				}

			}

		}

		return $g

	}
The sprites are scaled using a simple math trick. Rather than looking directly at our x position in the sprite we look at what fraction of the width we're rendering accross that we have gone over and multiply it by the actual width of the sprite.
pX=Math.floor((k-sx)/wd*16)&15;
k is the current x screen location and sx is the starting x position. wd is the total width of the area we are rendering to. (k-sx)/wd will then go from zero to not quite one. pX then goes from 0 to 15 which is the number of columns in the sprite. The same trick is used to scale the sprite vertically.
In previous lessons we used a color key and checked to see that the pixel value wasn't two before drawing it. In Wolf5K a mask is used. First we get the color of the sprite. Then we get the corresponding color of the mask. If the pixel value of the mask at the point is 1 then we plot the pixel. Just like PlotPixel we have a variable r which when non-zero inverts the color of the pixel before plotting it.
$f is the depth of the sprite we are rendering. This value is compared against the zBuffer so that only those vertical lines of the sprite are drawn which have an equal or lower Z value than anything that is already rendered. If you ignore the z buffer you can see the monsters even though a wall is in the way. The variable $g is returned as 1 if any part of the sprite is drawn. Monsters actually "hide" if they can't be seen for more than a few frames. The simply stop moving until you run into them again.
The limitation of a z-buffer which only has one variable per column of pixels is that you must draw back to front. The objects are all sorted based on their distance from the player before being rendered. Otherwise you would not be able to see through a sprite to see other sprites behind it. This also results in overdraw since the sprite behind is drawn as much as is visible and then the sprite in front is rendered and redraws over portions of the sprite behind it.
You'll also notice that the DrawSprite routine doesn't take rotation into account. In the real Wolfenstein 3D there are 8 sprites for every frame of animation. Since our sprites are flat we can't actually rotate them so Wolf 3D had the rotations predrawn in the sprite for 8 different views. Which rotation of the animation shown was based on the direction the object was moving and the direction the player was facing. This limitation was removed once actual 3D models started being used.
Now onto the Start function which is named S in the original code. This function takes care of incrementing the level number and initializing the map and object. The first part of the function is the initialization:
	frameDelay=36;	// we want to wait 36 frame

					//delays before the game actually starts

	gameLevel++;	// increment the level number

	playerX=playerY=128;	// initial player location

	numKilled=numMonsters=playerRotation=0;

	p=[].concat(BlankScreen);	// store the blank screen in the "video memory"

	DrawNumber(gameLevel,W/2-2,H/2,1);	// draw the level number on the screen

	ShowScreen();	// display the result to the user
When the game is first started gameLevel is set to 0. The first run through Start sets the game level to one, initializes the player's location among other basic variables and then builds the start screen you first see with the number in the middle. You can see the DrawNumber function is used and then ShowScreen is called. frameDelay is just that. In the main loop which you'll see later the first check is the frameDelay. If it's greater than 0 then it's decremented by 1 and the functon returns. This creates the delay before the action starts.
	w=[];	// w is the world map,

	var d1=30+4*gameLevel;	// d1 is the number of wall cubes that will be put in the map

			// we do not care if they are all in unique locations

	while(d1)

	{

		x=Math.floor(Math.random()*16);

		y=Math.floor(Math.random()*16);

		if(x*y>4)

		{

			w[y]=w[y]|1<<x;	//w is an array of bits and we have a 16x16 map

			d1--;

		}

	}
The section of code that initializes the map is pretty straight forward. 30 + 4 * gameLevel wall cubes are randomly placed in the map. The only condition is that x*y is greater than four. Since the player always starts in tile 2,2 this prevents a tile from being placed directly on the player. There are no checks to ensure that a monster isn't blocked in where the player can't get to it. It's just very unlikely to happen considering that only 11.7% of the playing field is walled plus 1.6% per level. It's just a demo. Nobody is really expected to play it that much. It also doesn't check to see if a location already has a wall tile so there's a good chance there will be less actual wall tiles than the variable defines there to be.
The final part of the start function is the portion which initializes the health and monsters.
	$h=[]; //$h holds all the object information

	i=6+4*gameLevel; //i is the number of objects

	while(i)

	{

		//random location for object

		x=64*(Math.floor(Math.random()*12)+2);

		y=64*(Math.floor(Math.random()*12)+2);


		//one in every eight objects is a health kit

		j=i%8?1:0;


		//make sure the location is valid

		if(!IsNotValidLocation(x,y))

		{

			var o=[];

			o.x=x;

			o.y=y;

			o.i=j; //i is the object type.  1 == monster 0 == health

			k=Math.random()>.5?1:-1; //random starting movement


			//no special handling for health

			//just set its movement to zero

			o.dx=j?Math.floor(Math.random()*64/4*gameLevel)*k:0;

			o.dy=j?Math.floor(Math.random()*64/4*gameLevel)*k:0;


			o.z=0; //we are not dead yet

			o.c=0; //meaningless default value

			$h[$h.length]=o; //store the object

			i--; //we have i-1 to go

			numMonsters+=j; //number of enemies, only add one if not health

		}

	}
Just like placing the wall tiles we pick a random location except now we care about where the object is being located. We don't want to place an object in the same location as a wall tile. j is used to decide if we are placing a health kit or a monster. For every 7 monsters there is one health kit. When setting the movement speed we just set it to zero for health kits or the random speed for monsters.
And that's all there is to rendering sprites and initialing the game. In the next lesson we'll cover the main loop.
The main loop handles quite a number of things including the frame delay and moster AI. In the original code it's named tk and that isn't changed in the deobfuscated code. We'll just take it one piece at a time and explain what it does.
	// frameDelay is a pause variable.

	// frameDelay*50ms is the time delay before we actually start

	// doing anything again

	if(frameDelay>0)

	{

		frameDelay--;

		return;

	}
The frame delay is quite easy. You just set the frameDelay variable greater than one and until that many frames have passed the user won't be shown a new screen. The next check determines if the level has been beat.
	//numMosters is 1 greater than there actually are

	//so if 1 is left then there are zero left

	//start a new level

	if(numMonsters-numKilled<2)

	{

		Start();

		return;

	}
Again, just a simple check to see if the user has killed all the monsters and if so the Start function is called and a new level begins. Each level brings more monsters, more walls and faster monsters. This next bit of code covers monster AI.
	for(i in $h)

	{

		var o=$h[i];

		if(!o.z)

		{

			if(o.c<3) //if the object is not out of view of the player for 3 frames

			{		  //then move the monster otherwise it can stay hiding

				if(IsNotValidLocation(o.x+o.dx,o.y+o.dy))

				{	//if the enemy hit a wall then reverse its direction

					//of travel.

					o.dx=-o.dx;

					o.dy=-o.dy;

				}

				//move the enemy

				o.x+=o.dx;

				o.y+=o.dy;


				//set the move flag to one so we update the screen

				M=1

			}


			if(!o.i&&Math.abs(o.x-playerX)<64&&Math.abs(o.y-playerY)<64)

			{//player ran into a health.  Make it go away and reward the player

			 //set cz to 1 so that we do not display the flash of red

				o.z=1;

				playerHealth+=(64-playerHealth)/4;

				cz=1;

			}

		}

	}
o.z determines if a monster is dead. So that's the first check made before applying movement to the monster. o.c counts the number of frames that the monster isn't visible to the user. If the monster is hidden for 3 or more frames, it doesn't move. The next step is to see if the location the monster will be moving to is valid. If it's not, the monster goes back the way it came. The net result is that monsters move in a straight line back and forth between the two walls tiles they run into. Notice we don't check to see if we're handling a health kit before applying movement. This is because when a health kit is initialized the dx and dy are set to 0. It just takes less code to set dx and dy to 0 than to add a check here to see if we're applying the movement logic only to monsters. Once that's all done then we set M to 1 to indicate something has changed so we need to update the screen for the user.
o.i is 0 if we're dealing with a health kit so we check for !o.i and the location of the player relative to the object to determine if the player has aquired the health kit. If so, o.z is set to 1 to indicate the health kit is "dead" so it's not drawn, the player's health is restored relative to their remaining health and then cz is set to 1 to try to unset cz in the case that a player was shot the same time they got the health.
We already covered the next sections of code which handle U and fwd in the tutorial covering user input. Next up is the M check. The first chunk of code sets up all the variables needed to render the object relative to the player.
		//find the angle between the player and the object

		var cz;

		var tx=Math.cos(playerRotation);

		var ty=Math.sin(playerRotation);

		//var $z=Math.sqrt(tx*tx+ty*ty);

		//sqrt(cos^2 + sin^2) is always 1

		//I am not sure what this was

		//intended to do


		$z=1;

		for(i in $h)

		{

			var o=$h[i];

			var x=o.x-playerX;

			var y=o.y-playerY;

			o.d=Math.sqrt(x*x+y*y);//distance to object

			o.a=Math.acos((tx*x+ty*y)/(o.d)); //angle of line between the two

			if(tx*y-ty*x<0) //if the translated/rotated x distance is less than 0

				o.a=-o.a

		}
This piece, if(tx*y-ty*x<0), should look familar. It's the same math we used in previous tutorials to have a polygon rotate relative to the position of the user. Except for this we only care about the final translated/rotated x position to determine if we should negate the angle. o.a is used later as you'll see to set up the variables used to draw the sprite.
		//sort the array of objects

		$h.sort(function(a,b){return b.d-a.d});

		for(i in $h)

		{

			var o=$h[i];

			var ht=Math.floor(64/o.d*DistToProjPlane);

			var $k=Math.floor(playerEyeLevel-ht/2);

			var $l=Math.floor(playerEyeLevel+ht/2);


			//if i is zero then it is a monster,

			//otherwise it is health

			var pat=o.i?2:3;


			//get the mask, for no particular reason

			//this is flipped

			var a9=o.i?5:4;


			o.l=Math.floor(W/2+o.a/R-ht/2);

			o.r=o.l+ht;

			if(o.z) //o.z determines if the object is dead

			{

				if(o.i)//if this is a monster

				{

					pat=8; //set it to a dead monster sprite

					a9=9

				}

				else // there is no dead sprite for anything else

					continue

			}


			if(o.i&&!playerDead&&o.c==1&&!o.z&&Math.random()<.05)

			{//player hit


				//reduce health 0-8 random

				playerHealth-=Math.floor(Math.random()*8);


				//set CZ to show red screen, PZ set to 2 (2 frame delay)

				cz=frameDelay=2;


				if(playerHealth<0) //if health is less than zero

				{

					playerDead=1; //player is dead


					//set the camera Y to 64/8 (fall down)

					playerEyeLevel=H/8;

				}

			}

			if(o.d>64&&DrawSprite(pat,a9,$k,o.l,$l,o.r,o.d))

				o.c=1; //o.c 1 indicates the monster is visible

			else

				o.c++; //otherwise count frames

					//monster not visible to player

		}
The first thing we do is sort the monsters based on their distance from the player. We want to draw them from back to front. ht is the number of pixels high the sprite will be based on the distance from the player. $k and $l center the height so that half is above the center of the screen and half is below. pat is the sprite number we want to draw and a9 is the mask of that sprite. o.l and o.r determine the min and max x position on the screen that the object will occupy. Since our sprites are square and never rotated we simply add ht to the left position of the sprite.
The next step is to see if the object is dead. If the object is dead and it's a monster we change the sprite and mask number to the dead monster sprite. If the object is a healt kit and dead we use the continue key word to skip the rest of the code and proceed back to the start of the loop and the next object. If we were to remove the continue the health kit would continue to be drawn even after the player had aquired it.
The next step is to see if a monster is in view of the player, alive and the player is not dead and if a the value of random is less than 0.05. If so, the player has been shot by a monster. The player's health is reduced a random amount, the screen is flashed red and then we check to see if the player is dead. playerEyeLevel determines the middle of the view area.
And finally, if the object is at least 64 pixels away from the user, we draw the sprite. If the DrawSprite function returns 1 when we know the object can be seen by the user. Otherwise we count frames that the object is not visible to the user. You can see that o.d is used to compare the distance the sprite is from the user to anything already in the z buffer.
The last part of the main loop draws the status information on the screen and displays the final render to the player.
		//this is our status information

		DrawNumber(playerPoints,2,H+1); //points

		DrawNumber(numMonsters-numKilled-1,26,H+1); //number of enemies left

		if(!playerDead)//if we're not dead then draw the gun

			DrawSprite(6,7,H-32,W/2-16,H,W/2+16,0);

		for(i=0;i<playerHealth;i++)//draw our health bar

			PlotPixel(W-2-i,H+3,1);

		ShowScreen(cz);//display the final screen to the user
And that concludes this lesson. The final lesson will cover the RayCast routine which is rc() in the original code. And once that lesson is complete you will be able to see the entire deobfuscated code for Wolf5K and play it.
The RayCast function (rc in the original code) handles the actual ray casting logic which renders the map. The first part of the code handles initializing a few variables and allocating a lot more.
	function RayCast()

	{

		//store the default background in the video memory

		p=[].concat(BlankScreen);


		//F is the view angle, the larger

		//F is the more we cram into the view area

		var c2=-F;


		//angle of the ray we are calculating

		var a=playerRotation+c2;


		//a6 tells us which of the two rays we used

		//to draw the scanline

		var a6=-1;


		//$d is the last value of a6

		var $d;


		//$Lht is the last scanline height

		var Lht;


		//c1 is the last value of $f

		var c1;


		//u is the vertical texture scanline

		//we will be drawing

		var u;


		//uh and uv are the values of u for

		//each of the rays

		var uh=uv=0;


		//a5 and a4 are the distance from the camera

		var a5=INF;

		var a4,$f,d2,dx,dy,$a,$b,$q,$r,$s,$t,$o,$p,ht;
I havn't renamed all the variables for this section of code because I'm not sure what names would really be appropriate for them. The original variable names work just fine anyway. The next part of the function creates the actual rays to determine which wall tile we are looking at and what part of it.
	//what scanline we are working on (0-128)

	for($v=0;$v<W;$v++)

	{

		c1=$f;

		Lht=ht;

		var c=Math.cos(a);

		var s=Math.sin(a);

		var t=s/c;


		//if a is 0 or 180 then we get a divide

		//by zero error so we ignore the ray

		if(!a||a==c3)

		{

			a4=INF

		}

		else

		{
c1 holds the prior $f value. Lht holds the prior ht value. c is the cos of the angle of the view s is the sine of the angle of the view and t is the tangent of the angle of the view. Through the magic of JavaScript we don't get a divide by zero error when c is 0. To understand why we are calculating two rays and why 0 and 180 are considered infinity you have to see what the render would look like if we only drew valid a4 ray casts and ignored the a5 ray.
What the a4 rays render
You can see that only one side of the wall is being drawn. Namely the left side of the wall. This is why if the ray is being cast at 0 or 180 degrees we don't bother doing any calculations. The ray is running parallel to the side of the way it's responsible for rendering. And since we're running parallel we will never hit the wall so we just move on to a5 and see what it can see.
What the a5 rays render
The a5 ray renders the front side of the wall. To get a better idea of what is going on here's a graphic that helps to illustrate the concepts.
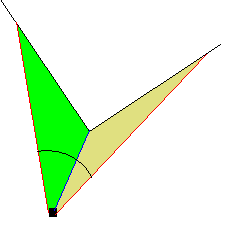
The black square is the camera. The black partial circle is the path the ray follows as it scans the view area. The black lines represent a wall tile. The bright green colored area is what the a4 rays render. The tan area is what the a5 rays render.
The following code sets up the initial parameters for the a4 ray.
	if(s>0) //if we are in the top two quadrants

	{

		//start at the tile in front of the player

		$b=Math.floor(playerY/64+1)*64;


		//increment in whole tiles forward

		dy=64;


		//start with an adjustment to the side of the player

		$a=playerX+($b-playerY)/t;


		//increment 64/t to the side

		dx=64/t;

	}

	else	//otherwise we are facing backwards

		//so we go in the opposite direction

	{

		$b=Math.floor(playerY/64)*64-.0001;

		dy=-64;

		$a=playerX+($b-playerY)/t;

		dx=-64/t

	}
Note that t is not infinite when a is 0 or 180. But since we are dividing, when t is infinite ($b-playerY)/t goes to 0.
If a4 is not infinite then we are dealing with a ray that is looking to hit the side of a wall tile. So we shoot the ray foward in increments of 64 which is one whole tile and then slightly off to the side based on the tangent of the angle of the ray. We store the offsets in dx and dy. s is the sine of the angle we're looking at. If s is > 0 then then we know we're in the top two quadrants of a circle so we move up. Otherwise we move down.
Once we have the direction and starting position of the ray, we then fire it off until it hits something.
	//while we have not hit a wall tile or edge of the map

	while(!IsNotValidLocation($a,$b))

	{

		$a+=dx;	//keep shooting the ray

		$b+=dy

	}
Until we run into a way or go outside of the map we keep incementing $a and $b by the offsets. Once we hit the way we do some final calculations and store the results.
	$q=$a;	//store the final location where the ray hits a wall tile

	$r=$b;

	a4=Math.abs((playerX-$a)/c);

	uh=$a%64;	//the pattern repeats every 64 pixels.


	if(s>0)

	uh=64-uh	//flip the pattern
$q and $r hold the final x and y positions of the ray. a4 is the distance from the camera. uh is the slice of the wall texture that we hit. If s>0 then we flip the value of uh. If we comment that out, tiles that are behind you are flipped horizontally.
	//if we are at 90 or 270 degrees our ray has infinite problems

	if(a==b2||a==c4)

	{

		a5=INF

	}

	else

	{

		if(c>0)

		{

			//start one tile to the side of the player

			$a=Math.floor(playerX/64+1)*64;

			dx=64;

			$b=playerY+($a-playerX)*t;

			dy=64*t

		}

		else

		{

			$a=Math.floor(playerX/64)*64-.0001; //start just behind player

			dx=-64;


			//at 90 and 270, t goes to infinity so multiplying

			//results in an invalid number

			$b=playerY+($a-playerX)*t;


			dy=-64*t

		}
Note that t is infinite when a is 90 or 270 and since we are multiplying instead of dividing as we do in a4, the value of $b would go to infinity if we didn't check for the this condition earlier.
The a5 ray is virtually identical. Except now we move the x position a constant 64 pixels and adjust the y based on the position of the player and the tangent of the angle. We also now check to see if the ray is at 90 or 270 degrees since that would place it parallel to the section of the wall we are looking to intersect with.
We also check the cosine of the angle to see if we're going to the right or to the left. If c is greater than 0 then we're going right, otherwise left and we position the ray's starting point accordingly. We then calculate the offsets based on the tangent of the ray's angle.
Finally we shoot it off just like we did with a4.
			//again look for the first wall tile we hit

			while(!IsNotValidLocation($a,$b))

			{

				$a+=dx;

				$b+=dy

			}


			$s=$a;

			$t=$b;

			a5=Math.abs((playerX-$a)/c);

			uv=$b%64;

			if(c<0)

				uv=64-uv
Except now we use the final y location of the ray to determine which slice of the texture we're looking at.
The next stage is to see which ray has the shortest distance from the player. We also store a6 in $d so we know which ray we last chose.
	$d=a6;

	//we are looking for the smallest distance to travel

	//both rays cannot be infinite at once so we pick the one

	//that is not infinite

	if(a4<a5)

	{

		u=uh; //texture scanline

		$f=a4; //distance from camera

		a6=0;

		$o=$q;	//map x position

		$p=$r;	//map y position

	}

	else

	{

		u=uv;	//texture scanline

		$f=a5;	//distance from camera

		a6=1;

		$o=$s;	//map x position

		$p=$t;	//map y position

	}
We used this same idea in the line drawing routine of ealier tutorials. It cuts down on the amount of redundant code quite a bit to store final values in generic variables. The next step is to set up our scan line.
		$f*=Math.cos(c2);

		zBuffer[$v]=$f;	//zBuffer is our z-buffer, $f is the depth of the scanline

		ht=Math.floor(64/$f*DistToProjPlane); //height of the scanline

		var dd=Math.abs(c1-$f);	//change in distance from previous $f

		var $k=Math.floor(playerEyeLevel-ht/2);	//the top of our scanline

		var $l=Math.floor(playerEyeLevel+ht/2); //the bottom of the scanline

		var b3=$k;	//starting position for scanning


		//a0 is the x pixel position in the texture

		//u will go from 0 to 63 so dividing by 4 gets us 0 to 15

		var a0=u/4;
$f is the adjusted distance from the player based on the cosine of the angle of the ray we just did the calculations for. We then store the zbuffer value for the current scanline, The comments are pretty self explainitory for the rest. The next chunk of code makes sure everything is in range and picks out the tile number of the wall we're rendering.
	if(dd > 64 && Lht > ht)  //Lht is the previous scanline height

		ht=Lht;


	if($k<0)	//make sure we are not trying to draw above the view area

		$k=0;


	if($l>=H) //if $l is greater than the height of the view area then adjust

		$l=H-1;


	x=Math.floor($o/64); //our tile position

	y=Math.floor($p/64);


	//if we're out of bounds of the map

	//and the level is less than 5 then

	//alternate wall tiles

	//otherwise use the enemy sprite as a wall

	//tile and alternate it.

	//if we're in bounds then use the default

	//wall tile 0

	var pat=(x<0||x>15)&&y%2?1:gameLevel>4?2:0;
The final section of code actually draws the scanline.
	//start at the top of the scanline and work down

	for(y=$k;y<$l;y++)

	{

		//var bit=0; //not actually used for anything


		//the row of pixels is based on the current y

		//y position. >>2 divides by 4.  64/4==16

		var b1=((y-b3)/ht*64)>>2;


		//we're subtracting from 15 because the tiles

		//are stored upside down

		var b2=bm[pat][15-b1]&1<<(a0&15);


		if(

			!(

			b2 ||	// is the color 1 or 0?


			//is $v 0 and $d not equal to a6 ($d is the prior version of a6)

			($v && $d != a6) ||


			//if our change in distance is greater than 64 and $v is non 0

			(dd >= 64 && $v) ||


			//skip pixels based on distance from player

			//this is how the "lighting" is done

			($f >= 64*3 && $f<64*4 && $v%4==y%4) ||

			($f >= 64*4 && $f<64*6 && $v%3==y%3) ||

			($f >= 64*6 && $v%2==y%2)

			)

		)

			//if after all of the checks we having something to plot

			PlotPixel($v,y)

	}


	a+=R;	//increment the ray angle

	c2+=R;	//
We increment both the angles we're working on by R which is the number of scanlines divided by the view angle and repeat the process 128 times to render the entire view. And that's it. You now know all you need to know to do basic ray casting. If you attempt to translate this to another language you will need to take into account that not many languages act kindly to divide by zero errors which the tanget calculation will generate as it is.
