Game & Watch: Fire
 By Xabi Vazquez - https://www.flickr.com/photos/xabi/2298135961/in/set-72157604106620735, CC BY 2.0, Link
Wikipedia: Game & Watch - Fire

The image from MarioWiki.com conveniently shows all the LCD elements ON which allows you to count the number of visual elements in the game. In this case there are about 38 visual elements that the LCD will display not including the time. We're not going to be replicating the "& Watch" portion of these games. Unfortunately, I have yet to find an image of the game that is useful for copying the visual elements from.
The reason we're picking this one (at least for the first round) is because it has a reasonable number of visual elements and the game mechanics are relatively simple.
If you're not familiar with how the game is played, here is an excellent video on YouTube.
Just from watching the video we can see there are three positions the player can be in: left, middle and right. There are only two buttons required to play the game. The smoke animation is just continuous and is not tied to game play. You can see in the still image above there is a fireman with a bell but that doesn't appear in the game play video. Also looking at the still image you can see how the people escaping the fire can start from two different positions. The top floor and the second floor. The top floor has an extra step before going into the common pattern for the top and second floor.
The player gets 1 point for every successful catch. Not just when a character makes it to the fire truck. If a player misses one of the characters, they appear below the player character and the "misses" count goes up.
More than one character can be bouncing at a time. And as the game progresses, it can speed up.
With this basic information of what's going on, it's possible to start simplifying the rules to get a working prototype created in JavaScript.
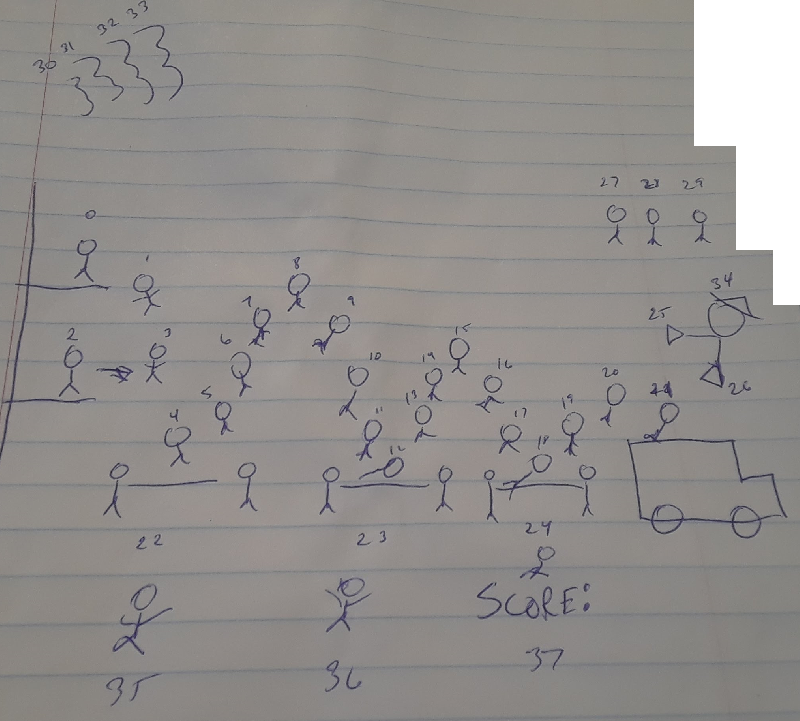
The first step to recreate the game is to map out the screen. Where a modern LCD screen has thousands of individual pixels, these old LCD games use the same concept but instead of pixels, complete images were drawn with the liquid crystal. The advantage is that you can use far fewer bits to render the screen, the disadvantage of course is that we're restricted with what we can do with the screen once it's created.
Where on a pixel based display you would consider the X and Y position of individual pixels, here we're numbering the images based on the logic of the program. Images that follow an animation pattern should generally be numbered next to each other. This way we can increment a counter more often than we make explicit jumps from one state to another.
The smoke animation is 4 frames that follow a particular pattern that can be observed by watching the game play. So those images are numbered 30 through 33. We can then loop a counter to go through the animation.
The person escaping from the fire mostly follows a single pattern. However, they can start at position 0 or position 2. If they start at position 2, they skip position 1. If they start at position 0, they skip position 2. Once into position 3, the pattern is identical and we can simply increment the frame counter for the instance of the character.
The player can be in one of 3 positions so we number those 22, 23 and 24. This way we can simply add or subtract 1 to move the player left and right.
Note that the only information we need about anything in this game is the frame. That means that for individual objects (player, character, fire, etc), they can be defined as integers in the code. We have no need for classes. Although you will see we will use a class to hold the program for the game itself.
Defining the Screen
In HTML, the easiet way to define an LCD screen is to use DIVs with fixed locations. We'll want to wrap the LCD elements in a DIV so we can use absolute positioning for the inner elements and have it play nice with the rest of our HTML. For now we're just using text rather than images to move the project along. We can spend some time drawing graphics for each of these elements later. The ID for each of the elements matches our hand drawn mockup from earlier. We'll use those IDs in the CSS stylesheet as well as the game code to show and hide the elements based on the game logic.
Note: View Source of this page to see the stylesheet being used.
        <div id="screen">
            <div id="element_0">Position 1</div>
            <div id="element_1">Falling 1</div>
            <div id="element_2">Position 2</div>
            <div id="element_3">Falling 2</div>
            <div id="element_4">Falling 3</div>
            <div id="element_5">Falling 4</div>
            <div id="element_6">Falling 5</div>
            <div id="element_7">Falling 6</div>
            <div id="element_8">Falling 7</div>
            <div id="element_9">Falling 8</div>
            <div id="element_10">Falling 9</div>
            <div id="element_11">Falling 10</div>
            <div id="element_12">Falling 11</div>
            <div id="element_13">Falling 12</div>
            <div id="element_14">Falling 13</div>
            <div id="element_15">Falling 14</div>
            <div id="element_16">Falling 15</div>
            <div id="element_17">Falling 16</div>
            <div id="element_18">Falling 17</div>
            <div id="element_19">Falling 18</div>
            <div id="element_20">Falling 19</div>
            <div id="element_21">Safe</div>
            <div id="element_22">Player Position 1</div>
            <div id="element_23">Player Position 2</div>
            <div id="element_24">Player Position 3</div>
            <div id="element_25">Bell Position 1</div>
            <div id="element_26">Bell Position 2</div>
            <div id="element_27">Miss 1</div>
            <div id="element_28">Miss 2</div>
            <div id="element_29">Miss 3</div>
            <div id="element_30">Fire 1</div>
            <div id="element_31">Fire 2</div>
            <div id="element_32">Fire 3</div>
            <div id="element_33">Fire 4</div>
            <div id="element_34">Fireman</div>
            <div id="element_35">Dead 1</div>
            <div id="element_36">Dead 2</div>
            <div id="element_37">Dead 3</div>
        </div>
"LCD" Screen
Left and Right Arrow Keys change the player position.
